
6.4 Preparing to Print
Learning Objectives
- Printing all of the worksheets in a workbook at one time.
- Preparing multiple worksheets for printing using grouping.
Just like consistency in formatting is important when working with workbooks containing multiple worksheets with the same type of data, so is consistency in page setup. Now that the Personal Budget 2017 workbook is complete, you are going to prepare it for printing by changing the page orientation and adding a header. You will also print all 13 worksheets at one time.
Applying Page Setup Options to Grouped Worksheets
Data file: Continue with CH6 2017 Personal Budget.
As always, you need to review your workbook in Print Preview before considering it complete. When you do that with this workbook, you notice that the worksheets are each printing on two pages. You decide to switch all the worksheets to Landscape orientation to see if that helps. You will also add a footer with the worksheet name to each of the worksheets.
- Go to Print Preview. To view all of the worksheets at one time, select Print Entire Workbook in the first box in the Settings section. You should now have 26 pages to scroll through in Print Preview. If you were to click the Print button, all of the worksheets would print, not just the active sheet.
- Exit Backstage View. You want to change the page orientation of all the sheets, but you cannot change all of them at one time in Print Preview.
- Group all of the worksheets together, including the Expenses Summary sheet through the December sheet.
- Click on the Page Layout tab on the ribbon, then select Landscape using the Orientation button in the Page Setup group.
- Click the Page Setup dialog box launcher arrow in the Page Setup group then click the Header/Footer tab.
- Click the Custom Footer button. In the center section, insert the worksheet name using the Insert Sheet Name button. The Footer dialog box should look like Figure 6.15.
- Click OK to close the Footer dialog box. Click OK again to close the Page Setup dialog box.
![Footer dialog box shows options with 3 fields below: Left section, Center section, Right section. Center section is only one with data "&[Tab]".](https://pressbooks.nscc.ca/app/uploads/sites/61/2016/10/image15-2.jpg)
Figure 6. 15 Insert Worksheet Name - Return to Print Preview to confirm that each worksheet is printing on one page, in landscape orientation, with the correct worksheet name appearing in the footer.
![Footer dialog box shows options with 3 fields below: Left section, Center section, Right section. Center section is only one with data "&[Tab]".](https://openoregon.pressbooks.pub/app/uploads/sites/7/2016/09/image15-2.jpg)
In Print Preview you notice that the Expenses Summary sheet is not set to print correctly. Part of the chart is appearing on a second page. You can easily fix this by changing the Scaling, but you only want to change the scaling of the Expenses Summary sheet, not the entire workbook. If you make the change in Print Preview while the worksheets are grouped it will change all of the worksheets.
- Exit Backstage View.
- Ungroup the worksheets by right-clicking on any of the worksheet tabs and selecting Ungroup Sheets.
- If needed, click on the Expenses Summary worksheet tab to make it the active worksheet.
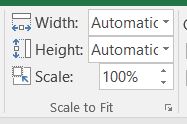
Figure 6.16 Scale to Fit - Click on the Page Layout tab on the ribbon and locate the Scale to Fit group of commands. (See Figure 6.16 above.)
- Click the drop-down arrow for Width: and select 1 page. This has the same result as selecting Fit All Columns on One Page in the Scaling setting in Print Preview.
- Return to Print Preview to confirm that the Expenses Summary worksheet is now printing on one page only.
- Exit Backstage View.
- Save the CH6 2017 Personal Budget workbook.
- Compare your work with the self-check answer keys (found in the Course Files link) and then submit the following files as directed by your instructor.

- CH6 Personal Budget
- CH6 Personal Budget Template
- CH6 Travel Expenses
- CH6 2017 Personal Budget
Key Takeaways
- To print all of the worksheets in a workbook at one time select Print Entire Workbook in the Print Settings.
- You can apply page setup options, such as scaling, orientation, and headers/footers, to multiple worksheets at one time by grouping the worksheets.
Attribution
“6.4 Preparing to Print” by Julie Romey, Portland Community College is licensed under CC BY 4.0
