
Operating the Tissue Processor
There are 14 reagent positions used in the Overnight Protocol. The running time is 13 hours.
| Position # | Reagent | Time / Temperature | Function |
| 1 | FORMALIN | 20 minutes / 37C | Fixation |
| 2 | PROCESSING H2O | 2 minutes/ 37C | Removes formalin |
| 3 | 70% ALCOHOL | 20 minutes/ 37C | Displaces H2O (Dehydration, diluted) |
| 4 | 80% ALCOHOL | 25 minutes/ 37C | Dehydration (diluted) |
| 5 | 95% ALCOHOL | 30 minutes/ 37C | Dehydration (diluted) |
| 6 | 100% ALCOHOL | 35 minutes/ 37C | Dehydration (absolute) |
| 7 | 100% ALCOHOL | 40 minutes/ 37C | Dehydration (absolute) |
| 8 | 100% ALCOHOL | 55 minutes/ 37C | Dehydration (absolute) |
| 9 | FORMULA 83 | 40 minutes/ 37C | Displaces alcohol (Clearing) |
| 10 | FORMULA 83 | 50 minutes/ 37C | Clearing |
| 11 | FORMULA 83 | 60 minutes/ 37C | Clearing |
| 12 | PARAFFIN WAX | 60 minutes/ 57C | Displaces Formula 83 (Infiltration) |
| 13 | PARAFFIN WAX | 60 minutes/ 57C | Infiltration |
| 14 | PARAFFIN WAX | 60 minutes/ 57C | Infiltration |
The following section is reproduced from the HistoCore manual: PEARL Tissue Processor Instructions for Use
Operation
Caution
Caution
Starting a program
- Make sure that the correct paraffin melting temperature has been set in the system settings
(→ P. 53 – 5.2.6 System Setup). - It is recommended to run the Bottle Check after the reagents are refreshed. For how to run a Bottle Check, see the section of System Setup (→ P. 53 – 5.2.6 System Setup).
Caution
- Not running Bottle Check function may cause tissue damage due to blockage or leakage, or lack of reagents.
- If the retort is contaminated by the reagents/paraffin, the Bottle Check function will be disabled to avoid tube blockage.
- Before running the Bottle Check, make sure that the retort is empty, clean and dry. Otherwise, the contamination in retort may occur and impact the tissue processing quality.
3. Put the baskets in the retort.
Note
Carefully handle the specimens and place into a cassette to avoid dropping into the retort
sieve holes.
4. Select a program in the program list panel. The selected program name and the icon are highlighted. Please double check that the highlighted program is the correct program that you want to run. Then press Start. The system reserves time for melting paraffin. The Start button on the pop-up message will be disabled for Standard User access. If the paraffin is already completely melted and you wish to start the program immediately, you must first switch to the Supervisor account, the Start button will then be enabled. Follow the messages on the pop-up window to proceed.
Caution
- Make sure that the paraffin in the paraffin baths are completely melted before pressing the Start button. Failure to do so could lead to paraffin blocking the liquid system
5. If RMS is set On and Cassette mode is selected, the following box pops up (→ “Fig. 66”).
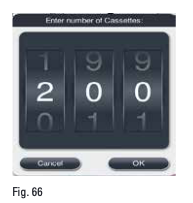
6. Select the cassette number and press OK. The End Time of Program window (→ “Fig. 67”) pops up. The default end time (→ “Fig. 67-1”) for the selected program is shown.
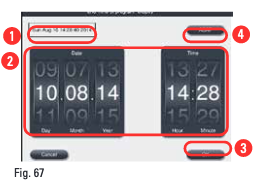
7. Set the day and the time (in 24-hour format) (→ “Fig. 67-2”) on which you want the program to end.
Note
8. Press OK (→ “Fig. 67-3”).
Note
» Or if you do not set the end time, press ASAP (→ “Fig. 67-4”) and then press Run (→ “Fig. 67-3”). The program starts. The Dashboard is switched to the program running panel.
Note
Examples
Monitor the instrument during Pre-checking and formalin soaking in the retort, in case any message pops up.
Examples
Do not open the retort lid or remove reagent bottles/paraffin oven cover/paraffin baths when a program is running, unless a system message indicates to do so. Doing so may cause damage to the instrument or trigger an error message.
Caution
Caution
Note
The Standard user can only pause the program at the first 3 steps, and abort the program at the first step. The Supervisor can pause or abort the program at any step.
After pausing, please be aware of the finish time of the processing program.
If the RMS is set to be in Cassettes mode, input the number of the newly-added cassettes. The number can not be 0, and the total number of the cassettes in the retort can not exceed 200. If no cassette is added, press Cancel.
Press the Start button to continue the program, and make sure that the retort lid is sealed after the cassettes are added.
Program running panel
Below figure (→ “Fig. 68”) is the dashboard panel while a program is running.
Ending a Program
When a program is completed, a message pops up, indicating that “The program is finished. Would you like to drain the paraffin?” Press OK, and the instrument starts to drain the paraffin.
Caution
5.9 Pre-installed program
Caution
6. Cleaning and maintenance
6.1 Cleaning program
Caution
Note
The Cleaning program cannot be edited, copied or deleted.
The Cleaning program is offered automatically when an infiltration program has been completed. In this case, a retort cleaning cycle MUST be carried out; this function cannot be cancelled.
Use only the recommended reagents.
| Cleaning program (full-step: approximately 1.5 hours)) | |||||
| Step | Reagent | Time (min) | Cycle | Temp. (°C) | Pressure/Vacuum |
| 1 | Cleaning xylene | 10* | 7 | 67 | Ambient |
| 2 | Cleaning ethanol | 3* | 3 | 62 | Ambient |
| Dry Step: | Empty Retort | ||||
| 3 | Vacuum step | 10 | 80 | Vacuum | |
| 4 | Ventilation step | 20 | Ambient | Ambient | |
| * Indicating the duration of soaking. | |||||
Running Cleaning program
The Cleaning program skips any steps not required to complete the cleaning of the retort.
- If the last step of a processing program is Formalin, Processing Water or Ethanol, the Cleaning Program will not run after the processing program completes.
- If the last step of a processing program is Xylene or Paraffin, the cleaning program will run after the program completes.
Caution
Caution
Caution
Caution
- After you touch the OK button, a message appears indicating that before the cleaning is started the retort must be empty and all specimens have to be removed.
- When all necessary conditions have been satisfied, press the Start button. Wait about 8 seconds, and
the cleaning program starts. The procedure is displayed graphically on the Dashboard. - After the cleaning program has been completed, a message appears on the screen if the temperature in the retort is high. Open the retort lid and wait for a few minutes to let it cool down.
Cleaning reagent warning message
If RMS is enabled, the following indicates that the warning threshold values have been exceeded.
- The exceeded bottle turns to red and flashes. The operator is notified that the reagent has exceeded and can replace this reagent before the program starts. However, it is also possible to start the program despite this at Supervisor level.
- The exceeded bottle turns to red and flashes at the end of a program (after the cleaning). You can go directly to the reagent Status window.
- The reagent status highlights the exceeded values in r
General instrument cleaning
6.2.1 Daily cleaning and maintenance
Instrument exterior
Clean the housing (including the instrument exterior, display, retort lid, counter area, etc) and the ground if contaminated by reagent. Wipe with a damp lint-free cloth moistened with mild detergent and dry.
Changing the reagents
- Never replace reagents or fill empty reagent bottles while a process is running. This can result in severe damage to the instrument.
- Make sure that the reagent bottles are placed in the correct position according to the reagent definition on the display. For reagent positions, see (→ P. 21 – 3.5.1 Cycle for changing reagents).
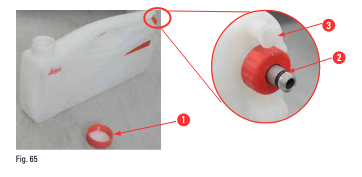
- Remove the reagent bottle from the reagent cabinet and unscrew the bottle cover (→ “Fig. 65-1”).
- Drain the used reagent into a bulk container.
- Clean the reagent bottle sufficiently before refilling.
- Refill the reagent bottle. The maximum and minimum fill levels for filling are embossed on the front of each bottle. Use a funnel for clean filling.
Note
- Place the filled reagent bottle back in the reagent cabinet. When inserting the reagent bottle, always make sure that the retaining ring (→ “Fig. 65-2”) is securely tightened and the connection port (→ “Fig. 65-3”) clicks into the back panel correctly.
- In the reagent status window, reset the data. For more information, see (→ P. 59 – 5.3.1 Reagent status).
Credits
Leica Biosystems. (2020). HistoCore PEARL tissue processor [Photograph] In HistoCore PEARL tissue processor instructions for use. https://www.leicabiosystems.com/sites/default/files/media_product-download/2022-01/HistoCore_PEARL_IFU_1v5G_en.pdf