
Microtomy
Operation of the Microtome[1]
Instrument Setup
Attaching the knife holder base, non-orientable
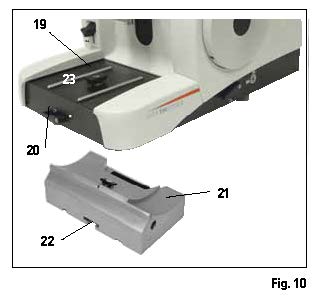
Release the clamping lever (20) by rotating it counterclockwise. (Position ο= released)
- Insert the universal knife holder base (21) using the notch (22) on the bottom into the T-piece (19) of the microtome base plate (23).
- To secure the knife holder base, turn the clamping lever (20) clockwise. (Position • = locked
Inserting the knife holder, non-orientable
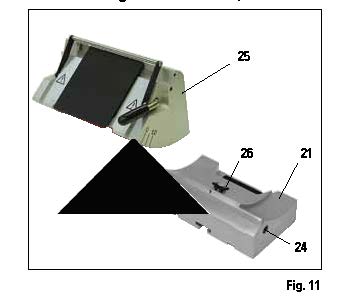
- Loosen the Allen screw (24) by turning it counterclockwise.
- Slide the notch of the knife holder (25) onto the T-piece (26) of the knife holder base (21).
- To clamp, turn the Allen screw (24) clock-wise.
Operation
Clamping the Specimen
Caution
Always clamp the specimen block BEFORE clamping the knife or the blade.
Lock the handwheel and cover the knife edge with the knife guard prior to any manipulation of knife or specimen, prior to changing the specimen block and during all work breaks!
- Rotate the handwheel until the specimen clamp is in the uppermost position.
- Activate the handwheel lock by allowing the handwheel handle to lock in place.
- Insert a specimen into the specimen clamp
Note
A detailed description for inserting the specimen into various specimen clamps and specimen holders is provided in Chapter 5.9 “Operation”.
Clamping the knife / disposable blade
Caution
Take care when handling microtome knives and disposable blades. The cutting edge is extremely sharp and can cause serious injuries!
- Carefully insert knife or disposable blade into the knife holder and clamp.
Note
A detailed description for inserting the blade or knife into the individual knife holders is provided in Chapter “Operation” in 5.9.8, 5.9.9, 5.9.10.
Adjusting the clearance angle
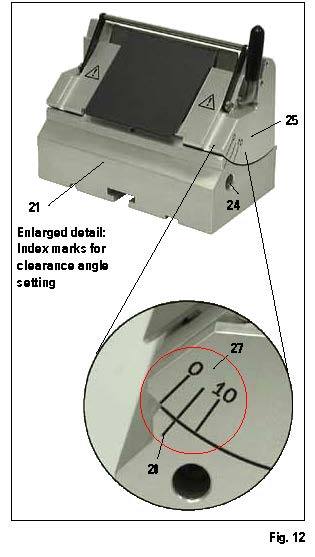
- The index marks (0°, 5° and 10°) for adjustment of the clearance angle (27) are located on the right side of the knife holder (25).
- There is also an index mark (28) on the right side of the knife holder base (21) which serves as a reference point when adjusting the clearance angle.
- When using the knife holder base (non-orientable), loosen the Allen screw to release the clamp by turning Allen key No. 4 (24) counterclockwise.
- When using the knife holder base (with lateral movement), rotate the lever on the right side of the knife holder base counterclockwise.
- Move the knife holder until the index mark of the desired clearance angle coincides with the reference line on the knife holder base. Example: Enlarged detail showing a clearance angle setting of 5°.
Note
The recommended clearance angle setting for knife holder E is approx. 1° – 3°.
- Firmly hold the knife holder in this position and rotate the lever (24) or Allen screw (depending on the knife holder base used) clockwise to clamp it.
Trimming the specimen

Course feed wheel (37)
The coarse feed is used tor fast horizontal specimen movement – forward, towards the knife- and backward, away from the knife.
The instrument is available wither with course feed (37) in either clockwise or counterclockwise sense of rotation. An arrow (32) indicates the sense of rotation.
When the course fed wheel is rotated in the direction of the arrow, the specimen advances towards the knife.
Once the specimen block has reached the rear or front limit stop, the course feed wheel becomes difficult to turn; in the front limit position, the specimen feed mechanism stops working.
Trimming the specimen with the course feed
- Unlock the handwheel (push handle (1) inward or release brake mechanism via lever (2)).
- Turn course feed wheel (31) to bring the specimen gradually close to the knife. At the same time, turn handwheel (15) to trim the specimen down to the desired level where you want to start sectioning.
Trimming the specimen via the section thickness selection
- Select a section thickness appropriate for trimming (e.g. 50 μm) with the section thickness selection knob (33).
- The thickness selected shows through window (34).
- Turn handwheel (15) until the specimen has been trimmed down to the desired level.
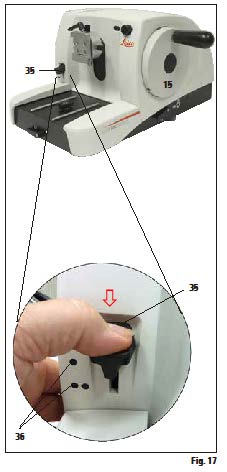
The Leica RM2125 RTS is equipped with a mechanical trimming function that is activated via the trimming lever (35). The trimming lever has 3 click stops: 0 μm, 10 μm, and 50 μm. The points (36) mark the two trimming stages:
• = 10 μm
•• = 50 μm
- To activate the trimming function, press the lever downwards into the desired position and keep it pressed down.
- With each rotation of the handwheel, a feed motion of 10 μm or 50 μm takes place.
After you let go of the lever, it springs back to its original position (zero position). The trimming function is thereby deactivated.
Caution
The section thickness that has been set is not added to the selected trimming value.
If the section thickness that has been set is greater than the selected trimming value, the section thickness is fed.
- Bring the specimen closer to the knife by rotating the coarse feed wheel.
- Select the desired trimming stage.
- Trim the specimen by rotating the handwheel (15) until the desired specimen plane is reached.
- Release the trimming lever (35).
Sectioning
Caution
Always rotate the handwheel at a uniform speed. The rotation speed of the handwheel must be adapted to suit the hardness of the specimen.
For harder specimens, use a slower speed.
CAUTION: The handwheel continues turning if it has been rotated very quickly and then released – this can cause crushing or other injuries!
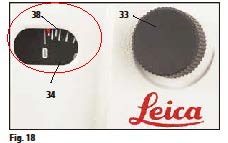
- Set the desired section thickness using the section thickness setting knob (33) at the front of the microtome on the right, or check the set value in the viewing window (34). The red indicator (38) indicates the selected section thickness (on the scale).
- Use a different area of the cutting edge for trimming than for sectioning.
- To do so, move the knife holder laterally on the knife holder base accordingly (see Chap 5.9.7) or, when using the knife holder base without lateral movement, move the knife or disposable blade in the knife holder.
- For sectioning, turn the handwheel (15) evenly in a clockwise direction.
- Pick up the sections and mount them on microscope slides.
Changing specimens
Caution
Lock the handwheel and cover the knife edge with the knife guard prior to any manipulation of knife or specimen, as well as prior changing specimens and during all work breaks!
- Move the specimen to the upper end position y turning the handwheel and engage the handwheel lock.
- Cover the sectioning edge with the knife guard.
- Remove the specimen from the specimen clamp and mount a new specimen.
- Run the object clamp with the course feed back far enough until the new specimen can start being cut.
Cleaning the Instrument
Caution
Always remove the knife/blade before detaching the knife holder from the instrument.
Always put the knives back in the knife case when not in use!
Never place a knife anywhere with the cutting edge facing upwards and never try to catch a falling knife.
When using cleaning agents, observe the manufacturers safety instructions and the laboratory regulations valid in the country of use.
Do not se any of the following for cleaning the outide surfaces of the instrument: alcohol, detergernts containing alcohol (window cleaner!), abrasive cleaning powders, solvents containing acetone or xylene. Xylene or acetone will damage the finished surfaces!
Ensure that liquids do not enter the interior of the instrument during cleaning!
Before each cleaning, carry out the following preparatory steps:
- Move the specimen clamp to the upper end position and activate the handwheel lock.
- Remove the blade from the knife holder and insert it in the receptacle at the bottom of the dispenser, or remove the knife from the knife holder and put it back in the knife case.
- Remove knife holder base and knife holder for cleaning.
- Remove the specimen from the specimen clamp.
- Remove section waste with e dry brush.
- Remove specimen clamp and clean separately.
Instrument and outside surfaces
If necessary, the varnished outside surfaces can be cleaned wit a mild commercial household cleaner or soap water and then be dried with a moist cloth.
Image Credits
Rankin. (2016). Leica RM2235 microtome [Photograph]. https://www.rankinbiomed.com/wp-content/uploads/2016/03/Leica-RM2125RM2125RT-Microtome-800×662.jpg
Leica Microsystems. (2016). Leica RM2125 RTS rotary microtome instruction for use. Leica Microsystems
- The section is reproduced from the Leica manual: RM 2125 RTS Rotary Microtome Instruction for Use. ↵