
Grossing Tissues
Recording Gross Descriptions
- Working with only one specimen at a time, match the requisition with the sample. Ensure the accession number and patient name on the specimen matches the requisition.
- Assess the fixation status of the specimen. Note the collection time and the time put into fixative, and calculate the difference. This is the cold ischemic (CI) time. A CI time longer than 1 hour should be addressed with a quality assurance form.
- Place a clean paper towel down on your work bench and rinse forceps before touching specimen to eliminate cross-over contamination.
- Open the specimen container. Inspect the tissue. Note the tissue to fixative ratio and the number of pieces. * If any fixative was added, that is to be recorded on the original requisition with your initials.
- Remove tissue from container using clean forceps.
- Place tissue on clean paper towel.
- Manipulate tissue gently, to observe all areas. Look for any irregular areas or different colors.
- Record specimen information such type of tissue on gross description portion of requisition.
- Record fixative information- received in formalin/other fixative or as fresh tissue, as well as any fixative amounts added at grossing
- Record measurements of tissue (3 dimensions) or 2 dimensions if flat tissue/core biopsy on gross description sheet
- Record weight for scrapings/curettings
- Record macroscopic findings such as:
- Color (tan, tan-brown, red-purple, brown black, transparent white, black, brown, pink)
- Shape or configuration (roundness, spherical, ovoid, cylindrical, rectangular, irregular, heaped up, raised, flat, bulging)
- Texture (smooth, rough, soft, firm, bony, mucoid, friable, rubbery, necrotic, dry)
- Architecture (solid, nodules, cavities)
- Pattern (uniformity)
- Consistency (firmness, softness, rubbery or fleshy texture)
- Secondary changes (necrosis, calcification)
- Odor, if obvious (rancid) **don’t routinely sniff tissue!**
- State if entirely submitted (in toto) or representatively submitted
- Note that certain foreign bodies (for example, surgical staples, sutures – except those inserted for orientation, vegetation, intrauterine devices) are described and included in the gross description, but are not submitted for processing.
Selection of tissue for submission
STEP ONE
- Evaluate your tissue measurements. Tissues must not exceed 3-4 mm in thickness to ensure proper processing, and must fit comfortably within the cassette. Any tissue outside of these dimensions must be further dissected CAREFULLY with a disposable scalpel. Ensure that tissue is secured between your forceps and that scalpel is handled according to given safety protocols. Disposal is always in approved sharps containers only.
- For small biopsies of < 0.5 cm in thickness, submit specimen in toto in biopsy cassette or in regular cassette between two blue sponges that have been saturated with formalin
- Bisect tissue if 0.5 – 1 cm in thickness.. Submit in toto in biopsy cassette, or in regular cassette between two blue sponges that have been saturated with formalin. If both pieces do not fit comfortably in one cassette, label a second cassette (A2) for submission.
- If your tissue is large you will have to submit several cassettes. For our purposes, if your tissue is >5cm consider it large. Submit minimum of two cassettes with 3 pieces in each. It is not necessary in this case to submit the tissue in total. Pick representative sections***
*** When selecting representative sections ensure you pick different areas, include suspicious looking tissue such as necrotic tissue.
CAUTION – Scalpel blades are extremely sharp! Use caution when removing the blade guard, always secure the tissue using forceps, and discard the scalpel blade in sharps container immediately after use
STEP TWO
After you have sectioned your tissue you will place it in the correct color cassette, depending on the tissue type and/or case priority:
- Green – URGENT cases
- Pink – Biopsy and small specimens
- White – Routine cases
LABELLING CASSETTES
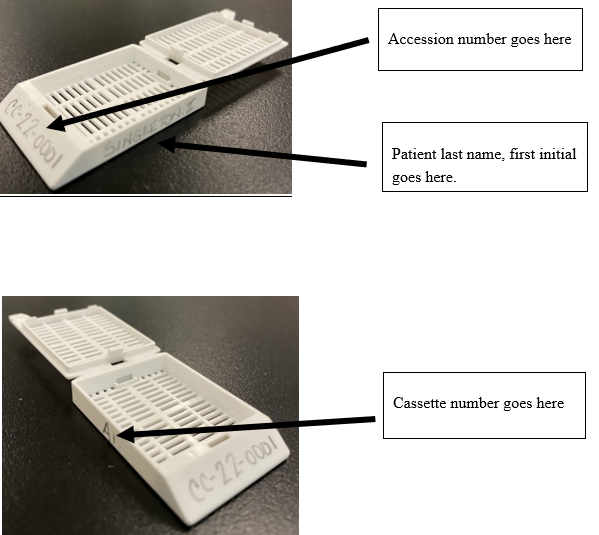
The cassette will now become the permanent piece of identification for the tissue. Therefore, it is IMPERATIVE that cassettes are labelled clearly and accurately.
For automated labs, printed cassettes are generated and the accession number, cassette number, and patient name must be verified before placing tissue into the cassette.
For labs who manually print their cassettes (as we do at NSCC), use a sharpened pencil to transcribe the following information:
Front of cassette: Accession number
Right side of cassette: Patient last name and first initial
Left side of cassette: Cassette number
Note: Do not use pen or other inks that are not resistant to solvents, as the information will be completely removed during tissue processing.
Labelling Cassettes
Example:
STEP THREE
-
- Close the cassette, ensuring that all sides of the lid are securely snapped in place.
- Submerge cassette in holding container with fixative.
- Record the number of cassettes and tissue pieces submitted, and whether specimen is entirely submitted (in toto) or representatively submitted. Initial the gross description record.
- Transcribe the number of cassettes and tissue pieces submitted into the Histology log book and initial.
- Thoroughly clean grossing instruments (rulers, forceps) and working surface before beginning the next specimen.
| Patient Name | Accession # | Tissue type | Measurements, color, shape, texture, consistency | Number of cassettes and pieces submitted / Initials |
| Smith, J CC-21-0002 Lymph node bx |
0.8 cm x 0.5 cm and 0.6 cm x 0.3 cm | 1 cassette | ||
| Tan, oval/raised, smooth, firm | A1 – 2 pieces submitted | |||
| Tissue submitted in toto | ||||
| MH | ||||
NUMBERING OF SPECIMENS, CASSETTES, SLIDES
When surgical tissue is put into specimen containers to go to the lab, it is usually separated by anatomical site. All containers received for a patient from a surgical event get the same accession number, but each container will get a separate designation. The system will vary from lab to lab, but this example shows what we will use here at NSCC:
Example: A colonoscopy procedure on a patient collects biopsy specimens from the duodenum, the jejunum, and the ileum. These arrive in the lab in three separate containers each labelled with the patient information and a different letter corresponding to the collection site: container A contains material from the duodenum, B from the jejunum, and C from the ileum. This information must be clearly indicated on both the requisition and the specimen containers.
In the lab, each container has its patient and site information verified. All three containers are given the accession number CC-23-0005, and each one is labelled with this accession number.
Container A has 9 pieces of tissue. This is generally more than is acceptable to put into a single cassette, so multiple cassettes are made with a number designated after the container number: CC-23-0005 A1 (6 pieces) and CC-23-0005 A2 (3 pieces).
Container B has 4 pieces of tissue, and is submitted into cassette CC-23-0005 B1
Cassette C has 1 piece of tissue submitted into cassette CC-23-0005 C1
All gross description information is recorded separately for each container and the number of pieces in each cassette is carefully transcribed.
When these cassettes are processed, it will be important to make sure that all submitted pieces for each cassette are accounted for, and that all the blocks from the case are kept together.
If multiple slides are cut on a block, these are given yet another number designation, after the block number. For example, if two slides are requested on the first block from container A, they would be labelled A1-1 and A1-2.
In this way, every slide can be tracked to the exact block it was cut from, and in what order if multiple slides are submitted. The order can be very important, especially for small biopsy tissues or lesions.
Here is the breakdown of another example of how a slide cut from a paraffin block would be labelled:
CC – 23 – 1234 B2 – 5
Lab code (CC) / Year (2023) / 1234th specimen accessioned / B container / 2nd cassette submitted from B /5th slide cut from block