
Microscope
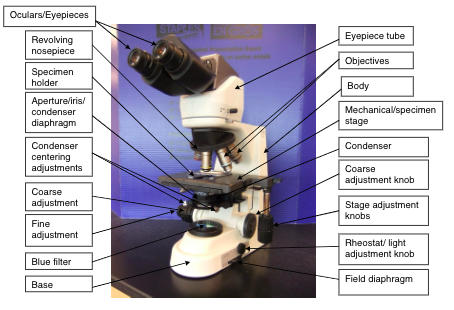
The Bright field microscope is a basic part of the work in many areas of the lab including Histotechnology, Hematology, Microbiology, Chemistry (urinalysis) and Transfusion Medicine. It consists of an illumination system, a magnifying system and a focusing system. Objects will appear dark against a light background. Because it is a precision instrument, it is to be kept in excellent condition both clean and aligned.
Kohler illumination is set each time a microscope is used to obtain optimal and even light distribution in the field of view.
Illumination system: Starts with a light source (bulb) controlled with an on/off switch. The light adjustment knob (rheostat) controls the light intensity. Light source is located at the base of the microscope and light is directed up through the condenser system. The condenser directs and focuses the beam of light from the bulb onto the object. The aperture iris diaphragm also controls the amount of light passing through the object, is located at the bottom of the condenser, under the lenses, and can be adjusted by a movable lever. An adjustable field diaphragm controls the area of the circle of light, in the field of view, and is used to align the light when performing Kohler illumination.
Magnification System: Consists of two magnifying lenses, the objective and the eyepiece (ocular). The ocular (eyepiece) magnification is 10 (10x) and objectives commonly used have magnifying powers of 4x, 10x, 40x, 50x (oil immersion), 100x (oil immersion). Magnification of the objective multiplied by the magnification of the ocular equals the total magnification. These magnification units are in terms of diameter therefore the object is magnified to ten times its original size.
E.g. (Ocular 10x) X (Objective 10x) = Total magnification 100x
Low power objective 10x (Microanatomy uses 4x objective to ‘scan’ slide initially) is used to initially locate objects and view large objects. Hematology-stained blood films, urine sediment, Microbiology-stained slides and Histotechnology stained slides are routinely examined by using the low power objective initially. The working distance is the distance between the objective and the specimen slide. The higher the magnification of the objective, the shorter the working distance will be.
Note: The course adjustment should not be used when using higher magnification lenses to prevent the objective from accidentally striking the slide.
High power objective 40x (high-dry) is used when greater magnification is needed and has a short working distance. After initial focusing using the low power objective, the high-power objective is carefully rotated into position and fine adjustment is used to bring the object into sharp focus. Hematology-stained blood films, urine sediment and Histotechnology stained slides are routinely examined by using the high-power objective.
Oil-Immersion objectives (50x, 100x) give the highest magnification and are used to view stained blood cells (Hematology) and stained slides containing microorganisms (Microbiology). The use of immersion oil improves resolution by filling the space between the objective and the specimen with oil rather than air. After initial focusing with the low power objective (10x), the objective is rotated slightly to the side to allow a drop of immersion oil to be placed on the slide directly over the condenser. The oil immersion objective (Oil-50x) is then carefully rotated into the drop of oil, taking care that no other objectives contact the oil. The object is then brought into focus using the fine adjustment. When the greatest magnification is required, rotate the objectives until the Oil-100x is in place and focus once again using the fine adjustment.
Note: Immersion oil should never be allowed to touch the low or high-power objectives!
It is especially important to clean the oil off the objectives immediately after use by first lowering the stage, rotate the objective to the front, wipe gently with clean lens paper. If not removed, oil may seep into the lens or dry on the objective surface impairing subsequent microscopy clarity! Commercial lens cleaner is also available. Lenses should never be touched with the fingers and if damaged be replaced. Good practice is to always clean the objectives before and after use!
Focusing System: The body tube is the part of the microscope through which the light passes to the ocular. The adjustment system enables the body tube to move up and down for focusing the objectives. The course adjustment gives rapid movement over a wide range and is used to obtain an approximate focus. The fine adjustment gives very slow movement over a limited range and is used to obtain exact focus after course adjustment.
Microscope Maintenance
- Use and store in a location free from vibration, dust, moisture; do not expose to extremes of heat and cold.
- When not in use, cover with dust cover.
- Clean objectives with lens paper (before and after use).
- If a microscope must be moved, carry in two hands – one supporting the base, the other holding the upper part.
- Ensure all oil is removed from the 50x/100x objectives with lens paper.
- After using, remove slides from the stage ensure the microscope is turned off and unplug.
- Clean stage with disinfectant if biological samples observed.
Safety
Electrical equipment safety rules must be followed. Electrical cords must be in good condition and plugged into grounded receptacles. Ensure the microscope is unplugged before attempting maintenance, repairs or replacing bulb! Glass slides should be handled carefully to avoid chipping or breaking. Appropriate PPE must be worn, and standard precautions observed when handling biological specimens. The microscope stage must be disinfected after examining such specimens. (Urine microscopic and gram stain).
Note
There are instances in which alternative microscopic applications may require you to adjust your Kohler illumination. Any adjustment of the microscope means that Kohler is no longer set and should be reset once you have completed the task. For example, when performing urinalysis or viewing other unstained samples you may have to lower the condenser to achieve a better contrast in the structures being viewed.
To obtain Kohler illumination
- Place a slide on the stage and focus the object using the low-power objective (10X). Ensure that the condenser is completely raised by turning the condenser focus knob towards the back of the microscope.
- Close the field diagram
- using the condenser focus knob, lower the condenser until the edges of the field diaphragm are sharply focused
- Center the image of the field diaphragm using the condenser centering adjustment screws
- Open the field diaphragm until its image is at the edge of the field. Then open it slightly more so that the image is just beyond the edge.