33 Topic C: Margin and alignment
Formatting – the appearance of a document. It is the shape, size, form, style, typeface, general arrangement, etc. of a document.
Page layout – the arrangement of text, graphics, pictures, and other elements on a page. It describes how each page of a document will appear when it is printed.
Basic page layout properties include
- Document margins
- Word / character spacing
- Line spacing
- Size and position of figures / images
- The number of columns
- How headers and footers appear

Document Margins
Set document margins (Word 2016)
- Open the document you wish to set margins.
- Click the Layout tab in the Ribbon.

- Click the Margins button (in the Page Setup group).

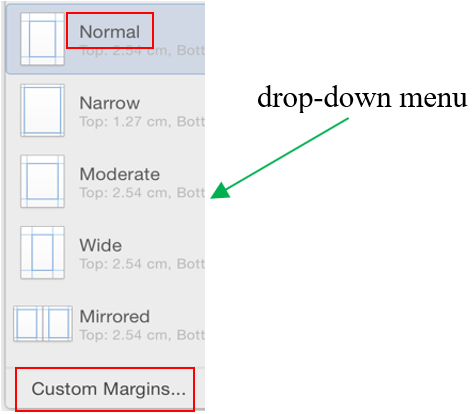
- Choose predefined margin settings (Normal) from the drop-down menu. (Or choose the Custom Margins command and set the margins that you want.)

Change the page margins for part of a document
- Select the part of the document for which you wish to change margins.
- Click the Layout tab in the Ribbon.
- Click the Margins button (in the Page Setup group).
- Click the Custom Margins command and set the margins that you want.
Text Justification and Alignment
Text justification / alignment – refers to how the left and right edges of a paragraph align on a page.
Types of justification / alignment
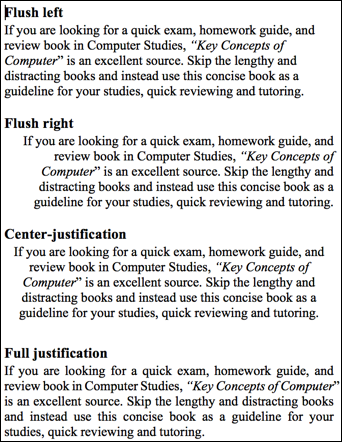
- Left-justification (flush left): align text along the left side (ragged on the right).
- Right-justification (flush right): align text along the right side (ragged on the left).
- Center-justification: text is aligned to neither the left side nor right.
- Justify (full justification): align text along the both left and right sides.
Align the text left
- Select the text that you wish to align.
- Click the Align Left icon on the Home tab (or press Ctrl + L or Cmd + L on a Mac).
- Left align (the standard layout – we read from left to right) is the default alignment for text in a Word document.
Align the text right
- Select the text that you wish to align.
- Click the Align Right icon (or press Ctrl + R or Cmd + R on a Mac).
- Right align is often used when formatting tables of data, attributions to authors of quotes, etc.
Center text
- Select the text that you wish to align.
- Click the Center Align icon (or press Ctrl + E or Cmd + E on a Mac).
- Center-justified text is commonly used on title pages, chapter titles, headings, etc.
Justify text
- Select the text that you wish to align.
- Click the Justify icon (or press Ctrl + J or Cmd + J on a Mac).
- Justification gives text a cleaner, more formal look. Justified text is often used in some newspapers, magazines, books, etc.
the appearance of a document. It is the shape, size, form, style, typeface, general arrangement etc. of a document.
the arrangement of text, graphics, pictures, and other elements on a page. It describes how each page of a document will appear when it is printed.
refers to how the left and right edges of a paragraph align on a page.
align text along the left side (ragged on the right).
align text along the right side (ragged on the left).
text is aligned to neither the left side nor right.
align text along the both left and right sides.


