
5 Caring for Minor Injuries and Preparing for and Managing Emergencies
Learning Objectives
By the end of this chapter, you should be able to:
- List items to include in first aid and emergency kits.
- Outline the responses to minor cuts and scrapes, burns, broken bones, head injuries, bites, and foreign objects in the body.
- Describe the lifesaving responses to severe bleeding, choking, and not breathing or being without a pulse.
- Discuss lost or missing child prevention and response.
- Explain response to unauthorized persons on the premises.
- Identify potential disasters and emergencies that early care and education programs should prepare for.
- Summarize the three phases of emergency management (preparedness, response, and recovery).
- Distinguish when to use each type of emergency response (evacuation, sheltering in place, and lockdown).
Introduction
An emergency is a situation that poses an immediate risk to health, life, property, or environment. Most emergencies require urgent intervention to prevent a worsening of the situation. Some emergencies will be obvious (such as natural disasters), but others will require early childhood educators to decide if it truly is an emergency. [1]
Once an emergency has been identified, it’s important to know what to do. This chapter introduces different first aid and emergency medical responses, the phases of a disaster, and more information about a few different types of emergencies.
Basic First Aid
“Minor accidents and unintentional childhood injuries are not unusual in the child care setting. Even with careful supervision, children frequently sustain scrapes, bruises, cuts, bites, and falls in the normal course of their day. Less frequently, medical emergencies…may require immediate intervention and treatment.”[2]
First Aid Kits
Here is a recommended list of supplies for the first aid kit (modified from the Emergency First Aid Guidelines for California Schools):
- Current National American Red Cross First Aid Manual or equivalent.
- American Academy of Pediatrics First Aid Chart.
- Pocket mask/face shield for CPR.
- Disposable gloves (including latex-free gloves for persons with a latex allergy).
- Soap (plain)
- Cotton tipped applicators, individually packaged.
- Assorted Band-Aids (1”x3”)
- Gauze squares (2”x2”’; 4”x4”), individually packaged.
- Adhesive tape (1” width)
- Gauze bandage (2” and 4” widths) rolls
- Ace bandage (2” and 4” widths)
- Splints (long and short)
- Cold packs
- Triangular bandages for sling & Safety pins
- Tongue blades
- Disposable facial tissues
- Paper towels
- Sanitary napkins [2]
Minor Cuts and Scrapes
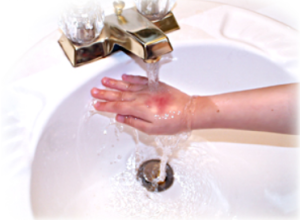
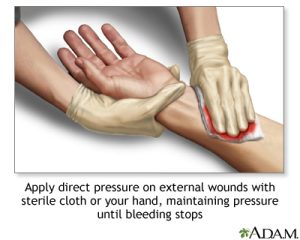
Before performing first aid for minor cuts and scrapes, early childhood educators should wash their hands and apply gloves. The cut or scrape should then be washed with cool water. The surrounding area can be washed with soap, but soap should not get into the wound. The cool water will wash away any debris that may be in the wound and will help blood vessels to constrict (become narrower), which helps to stop bleeding. Once the area is clean and the blood has decreased, place gentle pressure on the wound with a clean and sterile gauze pad. If the first gauze saturates with blood, add additional gauze pads. Gauze pads should not be removed, as this could cause any clots that have begun to form to be removed and bleeding to continue. When the wound has stopped bleeding, the cut or scrape can be covered by a clean bandage. Be sure to document the injury and communicate what happened with families. [3], [4]
Burns
The treatment of burns depends on the type of burn (refer back to Figure 3.20). The first step for any burn is to remove the source of heat. For minor burns that are limited to a small area, a clean cool towel or cloth can be applied to the skin or the skin can be flushed with cool water. Do not use ice. A clean, dry sterile piece of gauze can then be taped over the area when the burn is cooled and is only first degree. Ointments, grease, and oils should never be put on a burn. And blisters should not be broken. Children with second degree burns should be referred for medical care. Emergency care must be sought (call 911) any time a child receives a third degree burn. [6], [7]
Broken Bones
If a child breaks a bone, it will require medical treatment. The child should be comforted and not be moved any more than necessary. Any bleeding should be stopped (apply pressure with a sterile bandage or clean cloth), the area should be immobilized, and the family should be contacted to seek medical care. If the child is not conscious, there is heavy bleeding, the bone has pierced the skin, or the break is suspected in the back, neck, or head, immediate emergency medical care should be sought. [8]
Head Injuries
Most trauma to the head is minor and will not require first aid. But trauma that is associated with symptoms of a concussion (such as nausea, unsteadiness, headaches) needs to be evaluated by a medical professional. More serious injury indicated by the following warrant calling for emergency medical care (911). Keep the child still, stop any bleeding, and monitor vital signs (and start CPR if needed).
Symptoms of severe head injury:
- Severe bleeding or bleeding from nose or ears
- Change in consciousness
- Not breathing
- Confusion or slow response to questions
- Dizziness, balance problems, or trouble walking
- Unequal pupil size
- Slurred speech
- Seizures
- Persistent crying
- Refusing to eat
- Repeated vomiting
- Bulge in an infant’s soft spot[9], [10]
Injuries to the Mouth
Injuries to the head, face, and mouth are common in young children. Even when families do their best to keep children safe, oral injuries can happen. Most oral injuries happen when young children are learning to walk. The top front teeth are injured most often.
If the child’s tongue or lip is injured, the area should be cleaned. Ice wrapped in a clean cloth can be placed on the area to reduce swelling. If the bleeding doesn’t stop after 30 minutes, medical attention should be sought.
If a child has an injury to a tooth, families should contact a dentist for advice. Teeth that are knocked out should not be put back in the mouth. [11]
Injuries to the Nose and Nosebleeds
Nosebleeds are not unusual and not usually a health concern. If a child gets a nosebleed they should be reassured. They should sit upright and gently pinch the soft part of the nose for about 10 minutes (or the bleeding may start back up). Discourage nose-blowing, picking, or rubbing. [12]
If a nosebleed is heavy and won’t stop after 30 minutes, the child feels lightheaded, or the nosebleed is the result of an injury that may indicate a broken nose emergency medical care should be sought. [13]
Pause to Reflect
- What experiences do you have with first aid (giving or receiving)? How might this affect how you respond to a child getting injured?
- In addition to providing treatment for the injury, what else might an injured child need from a caring adult to feel emotionally safe?
Poisoning
If a child ingests a potentially poisonous substance, Poison Control should be contacted at 1-800-222-1222. They will advise about the effects of the substance that has been ingested and what the proper response should be.
Bites
How you will respond to bites depends on what bit (or stung) the child and how severe the injury is. Table 5.1 provides more information.
| Table 5.1 – First Aid for Bites and Stings | |
| Type of Bite/Sting | First Aid Response |
| Insect bites and stings [14] | For mild reactions. Move stinger (if needed) Wash with soap and water Can apply a cold compress.For severe reactions: Use epi-pen (if the child has one) Call 911 Being CPR if needed. |
| Animal bites [15], [16] | Wash wound with soap and water. Apply antibiotic ointment and bandage. If unsure if the skin was punctured have family consult a physician. |
| Venomous snakebites [17] | Remove the child from the area of the snake. Get a good description of the snake. Elevate area of snakebite and keep child calm. Call 911. |
| Human bites [18] | If the bite doesn’t break the skin: Wash with soap and water.If the skin is broken: Stop any bleeding Wash with soap and water Apply clean bandage Have family consult a physician. |
Foreign Objects in the Body
Foreign objects may end up on the inside of a child’s body. Table 5.2 lists ways to safely respond when this happens.
| Table 5.2 – First Aid for Foreign Objects in Body | |
| Location of Foreign Object | First Aid Response |
| Foreign object swallowed [19] | Most swallowed items will pass through the digestive tract. If the object is a battery, magnet, or sharp object medical care should be sought. If blocking the airway, treat according to choking first aid. |
| Foreign object in the nose [20] | Have child blow nose gently (not hard or repeatedly). Do NOT probe or have child inhale it. If easily visible and graspable, remove with tweezers. Child will need medical care if the object remains in the nose. |
| Foreign object in the ear [21] | If the object is visible and graspable, remove with tweezers: Do NOT probe ear Try using gravity by tipping the head to the affected side If those fail to dislodge the object, refer to the family for additional methods of removal or to have them seek medical assistance. |
| Foreign object in the eye [22] | Flush eye with a clean stream of warm water. Don’t try to remove an embedded object. Don’t allow the child to rub the eye. If unable to remove with irrigation have family seek medical care. |
| Foreign object in the skin [23] | If the object is small, such a splinter or thorn just under the surface of the skin: Wash hands Use tweezers to remove the object If the object is more deeply embedded in the skin or muscle Don’t try to remove it Bandage the wound by wrapping it with gauze without applying extra pressure |
Lifesaving First Aid
Sometimes children will experience incidents or injuries that are a threat to their life. It’s important that early childhood educators know how to respond in these situations. It is recommended that every person working with children become certified in emergency response through an agency such as the Red Cross (licensing requires one staff member that is certified to be on-site at all times).
Situations such as the following are considered medical emergencies and early childhood educators should contact emergency medical services (911) if a child exhibits these symptoms:
- Bleeding that will not stop
- Breathing problems (difficulty breathing, shortness of breath)
- Change in mental status (such as unusual behaviour, confusion, difficulty arousing)
- Choking
- Coughing up or vomiting blood
- Loss of consciousness
- Sudden dizziness, weakness, or change in vision
- Swallowing a poisonous substance [24]
While waiting for paramedics, early childhood educators will need to follow appropriate lifesaving procedures. Three of those responses are introduced below (but are not a substitute for becoming CPR and First Aid certified)
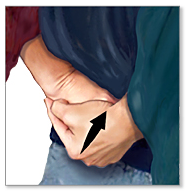
Responding to Severe Bleeding
Bleeding from most injuries can be stopped by applying direct pressure to the injury. This keeps from cutting off the blood supply to the affected limb. This procedure was introduced earlier in the section on responding to minor cuts and scrapes. [25]
Responding to Choking
If a child is not able to breathe, not able to cry, talk, or make noise, turning blue, or grabbing at their throat, or coughing and gagging the early childhood educator should call 911. If they are able to cough or gag (which indicates they are breathing), no further response is needed. If they are not breathing, an immediate response is important.[27]The response to choking is called the Heimlich maneuver and varies based on the age of the person that is choking. If the child loses consciousness at any point start CPR (which is covered in the next section).
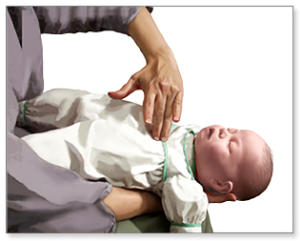
Responding to a Choking Infant (under 1 year of age)
- Lay the infant face down, along your forearm. Use your thigh or lap for support. Hold the infant’s chest in your hand and jaw with your fingers. Point the infant’s head downward, lower than the body.
- Give up to 5 quick, forceful blows between the infant’s shoulder blades. Use the heel of your free hand. [28]
- If the object is not dislodged, turn the infant face up. Use your thigh or lap for support. Support the head.
- Place 2 fingers on the middle of his breastbone just below the nipples.
- Give up to 5 quick thrusts down, compressing the chest 1/3 to 1/2 the depth of the chest.
- Continue this series of 5 back blows and 5 chest thrusts until the object is dislodged or the infant loses consciousness. [29]
 |
 |
Responding to a Choking in a Child (over 1 year of age)
- Lean the child forward and make 5 blows to their back with the heel of your hand.
- If this does not work, stand behind the child and wrap your arms around the child’s waist.
- Make a fist with one hand. Place the thumb side of your fist just above the child’s navel, well below the breastbone. [32]
- Grasp the fist with your hand.
- Make 5 quick, upward and inward thrusts with your fists.
- Alternate between 5 blows to the back and 5 thrusts to the abdomen until the object is dislodged and the child breathes or coughs on their own. [33]
 |
 |
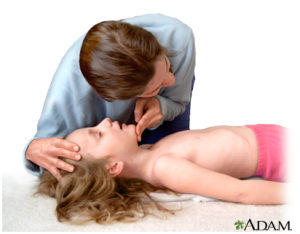
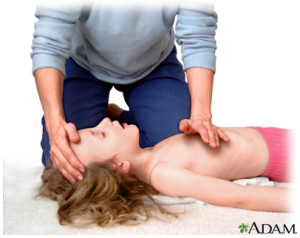
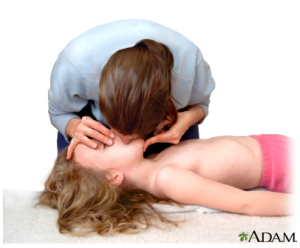
Responding to Children Who are Not Breathing or Without a Pulse
CPR stands for cardiopulmonary resuscitation. It is a lifesaving procedure that is done when a child’s breathing or heartbeat has stopped. This may happen after drowning, suffocation, choking, or an injury. CPR involves:
- Rescue breathing, which provides oxygen to a child’s lungs
- Chest compressions, which keep the child’s blood circulating
Permanent brain damage or death can occur within minutes if a child’s blood flow stops. Therefore, you must continue CPR until the child’s heartbeat and breathing return, or trained medical help arrives.
CPR is best done by someone trained in an accredited CPR course. The newest techniques emphasize compression over rescue breathing and airway management, reversing a long-standing practice. The procedures described here are NOT a substitute for CPR training.
Machines called automated external defibrillators (AEDs) can be found in many public places and can be purchased for homes and early care and education programs. These machines have pads or paddles to place on the chest during a life-threatening emergency. They use computers to automatically check the heart rhythm and give a sudden shock if, and only if, that shock is needed to get the heart back into the right rhythm. When using an AED, follow the instructions exactly.
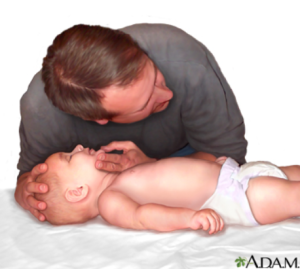
CPR for Infants (under 1 year of age)
- Check for responsiveness.Shake or tap the infant gently. See if the infant moves or makes a noise. Shout, “Are you OK?”
- If there is no response, shout for help.Send someone to call 911. Do not leave the infant yourself to call 911 until you have performed CPR for about 2 minutes.
- Carefully place the infant on their back.If there is a chance the infant has a spinal injury, two people should move the infant to prevent the head and neck from twisting. [35]
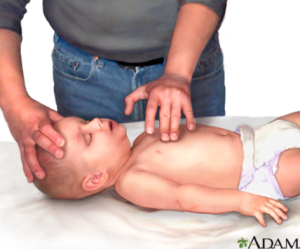
- Perform chest compressions:
-
- Place 2 fingers on the breastbone — just below the nipples. Make sure not to press at the very end of the breastbone.
- Keep your other hand on the infant’s forehead, keeping the head tilted back.
- Press down on the infant’s chest so that it compresses about 1/3 to 1/2 the depth of the chest.
- Give 30 chest compressions. Each time, let the chest rise completely. These compressions should be FAST and hard with no pausing. Count the 30 compressions quickly: “1, 2, 3, 4, 5, 6, 7, 8, 9, 10, 11, 12, 13, 14, 15, 16, 17, 18, 19, 20, 21, 22, 23, 24, 25, 26, 27, 28, 29, 30, off.” [36]
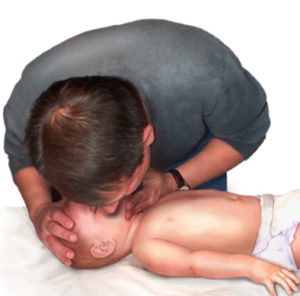
- Open the airway.Lift up the chin with one hand. At the same time, push down on the forehead with the other hand.
- Look, listen, and feel for breathing.Place your ear close to the infant’s mouth and nose. Watch for chest movement. Feel for breath on your cheek.
- If the infant is not breathing:
-
- Cover the infant’s mouth and nose tightly with your mouth.
- Alternatively, cover just the nose. Hold the mouth shut.
- Keep the chin lifted and head tilted.
- Give 2 breaths. Each breath should take about a second and make the chest rise.
- Continue CPR (30 chest compressions followed by 2 breaths, then repeat) for about 2 minutes.
- After about 2 minutes of CPR, if the infant still does not have normal breathing, coughing, or any movement, leave the infant to call 911.
- Repeat rescue breathing and chest compressions until the infant recovers or help arrives.
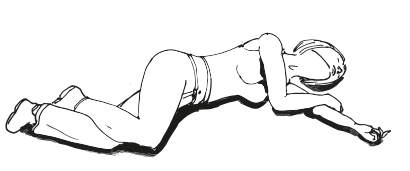
If the infant starts breathing again, place them in the recovery position (see Figure 5.12). Periodically re-check for breathing until help arrives. [37]
 |
 |
 |
CPR for Children (1 to 8 years of age)
- Check for responsiveness. Shake or tap the child gently. See if the child moves or makes a noise. Shout, “Are you OK?”
- If there is no response, shout for help. Send someone to call 911 and retrieve an automated external defibrillator (AED) if one is available. Do not leave the child alone to call 911 and retrieve an AED until you have performed CPR for about 2 minutes.
- Carefully place the child on their back. If there is a chance the child has a spinal injury, two people should move the child to prevent the head and neck from twisting. [41]
- Perform chest compressions:
- Place the heel of one hand on the breastbone — just below the nipples. Make sure your heel is not at the very end of the breastbone.
- Keep your other hand on the child’s forehead, keeping the head tilted back.
- Press down on the child’s chest so that it compresses about 1/3 to 1/2 the depth of the chest.
- Give 30 chest compressions. Each time, let the chest rise completely. These compressions should be FAST and hard with no pausing. Count the 30 compressions quickly:”1, 2, 3, 4, 5, 6, 7, 8, 9, 10, 11, 12, 13, 14, 15, 16, 17, 18, 19, 20, 21, 22, 23, 24, 25, 26, 27, 28, 29, 30, off.” [42]
- Open the airway. Lift up the chin with one hand. At the same time, push down on the forehead with the other hand.
- Look, listen, and feel for breathing. Place your ear close to the child’s mouth and nose. Watch for chest movement. Feel for breath on your cheek.
- If the child is not breathing:
- Cover the child’s mouth tightly with your mouth.
- Pinch the nose closed.
- Keep the chin lifted and head tilted.
- Give two breaths. Each breath should take about a second and make the chest rise.
- Continue CPR (30 chest compressions followed by 2 breaths, then repeat) for about 2 minutes.
- After about 2 minutes of CPR, if the child still does not have normal breathing, coughing, or any movement, leave the child if you are alone and call 911. If an AED for children is available, use it now.
- Repeat rescue breathing and chest compressions until the child recovers or help arrives.
- If the child starts breathing again, place them in the recovery position (See Figure 5.9). Periodically re-check for breathing until help arrives. [43]
 |
 |
 |
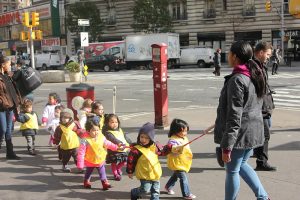
Lost or Missing Child
The best way to prevent children from going missing is to establish and follow procedures to monitor attendance. The following suggestions have been modified from New York City Health Code.
- Identify who is responsible for taking attendance.
- Identify when attendance will be taken .
- Identify how attendance is going to be confirmed, documented, and reported.
- Make sure that staffing schedules ensure that adult-to-child ratios are maintained at all times.
- Have clear procedures for any times children are transitioning between classrooms and outdoor spaces.
- Follow procedures for transitioning children that arrive late or leave early.
- Train all staff in procedures.
- For special events and field trips:
- A coordinator should be identified
- Ensure staff are familiar with the destination prior to event/trip
- Follow procedures for documenting parental approval
- Increase ratios with extra staff or volunteers (who have background clearance)
- Determine communication procedures with dependable methods (develop communication tree)
- Monitor attendance and take headcounts often
- Maintain trip attendance log
- Assign small groups of children to specific staff
- Establish areas for regrouping
- Take attendance before departure.
And here are the procedures to follow if a child does go missing:
- Establish instructions for reporting (when, how, and by whom)
- Establish procedures for searching for the child while maintaining supervision of all other children
- Document the incident
- Develop actions to be taken in response to the event. [48]
Unauthorized Adult Attempting or Gaining Access
There should also be policies and procedures in place to keep children safe from unauthorized persons on grounds of the early care and education program. Programs may choose to have entrances that are locked and only accessed through codes (each authorized person should have their own code) or by being buzzed in by a member of program staff.

Programs can also use cameras to monitor and record the entrances of the building, common spaces, hallways, classrooms, and outdoor spaces. Alarms and panic buttons are also something programs can consider using for added protection (and alarms protect the grounds even after hours of operation).
The front desk/entrance should be staffed with someone who can check each person entering to ensure they have been authorized to have access by matching their ID to the child’s record of authorized persons. Sign-in sheets should be used to document who is dropping each child off and who has picked them up. It is important to note that, unless the program has received a court order limiting the parent’s rights to custody, children cannot be kept from a parent.
The one exception to this is that according to California law, a program can deny access to an adult whose behaviour presents a risk to children in the program. According to the California Department of Social Services and the Child Care Advocate Program, if a parent comes to pick up their child while inebriated or under the influence of drugs, child care providers must:
- Make every effort to prevent the parent from taking the child by taking the recommended steps.
- Attempt to delay departure until you can contact another authorized person to pick the child up.
- Consider calling the police if the person refuses to cooperate or acts in a threatening manner.
- If the child is taken, write down a description of the vehicle and the license plate and report the situation to the parent/legal guardian and/or police.[51]
Response to Unauthorized Person’s Attempt to Pick Up Child
According to the Public Counsel Law Center: Early Care and Education Law Project’s Guidelines for Releasing Children, if an unauthorized person attempts to pick up a child, a program should:
- Resist their demands.
- Calmly request their ID and explain that the law requires that the enrolling parent/legal guardian authorize any person that will be permitted to pick up a child.
- Call the custodial parent right away and let them know what is happening.
- If the person refuses to comply, the police may need to be called.
- If the child is taken by force, get a detailed description of the person and vehicle to report authorities immediately.[52]
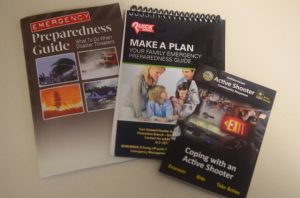
Disasters and Emergencies
Early care and education programs should consider how to prepare for and respond to emergency situations or natural disasters that may require evacuation, lock-down, or shelter-in-place and have written plans, accordingly. Written plans should be posted in each classroom and areas used by children. The following topics should be addressed, including but not limited to regularly scheduled practice drills, procedures for notifying and updating families, and the use of the daily class roster(s) to check attendance of children and staff during an emergency or drill when gathered in a safe space after exit and upon return to the program. All drills/exercises should be recorded.[53]
Emergencies often happen suddenly and can be devastating to programs and communities. Emergency preparedness is the process of taking steps to ensure your early care and education program is safe before, during, and after an emergency. Whether a natural disaster such as a tornado hits or a man-made emergency such as the appearance of a violent intruder occurs, early childhood educators need to know how to respond quickly and appropriately to situations that could happen in their program, center, or home. It’s important for every program to create an emergency preparedness plan specific to their location, building, and grounds.
Early care and education programs play an important role in supporting children and families in their local communities befo
re, during, and after an emergency through three phases of emergency management:
- Preparedness—Takes place before an emergency. It includes being informed about any likely emergencies in your area; mitigating any existing concerns at your facility that could make an emergency worse; making plans to respond to emergencies before they happen; and building, maintaining, and updating supply kits you will take or keep with you during an emergency.
- Response—Begins the moment you are alerted to an impending emergency and continues as the emergency occurs.
- Recovery—Happens as soon as the emergency is over, when efforts are focused on food, water, shelter, safety, and the emotional needs of those affected. Recovery is also the process of rebuilding your program and returning to normalcy after an emergency, which is why it can last hours, weeks, months, or even years in the most extreme cases.
Preparedness
Ensuring you are prepared and ready for everyday activities is essential, and it is something you do every day in your program. Preparing and planning for emergencies is no different. Use the self-assessment in Appendix F to determine the steps you may need to take to develop a comprehensive and effective emergency-preparedness plan.
You will also need to consider the types of emergencies your program could experience. What types of emergencies have previously occurred in your area? Is your program in a flood zone or an area commonly threatened by wildfire? Do you experience severe weather events? Is there a history of violence in your community? Here are some possible emergencies to consider:
- Tornado

Figure 5.15 – One threat to consider is wildfires [55] - Earthquake
- Hurricane
- Flooding
- Tsunami
- Thunderstorm
- House Fire/Wildfire
- Active Shooter/Violent Intruder (Prepared for?)
- Blackout/Power Outage
- Extreme Heat
- Winter Storm/Extreme Cold
- Landslide/Mudslide
- Volcanic Eruption
Your emergency plan should address all aspects of your early childcare education program, including the number and ages of enrolled children and any special health care needs or concerns of children and staff. While developing your emergency plan, use community resources for different perspectives and recommendations on preparedness, response, and recovery efforts. These resources can include but are not limited to:
- Child care health consultants
- Mental health consultants
- Child care resource and referral agencies (CCR&Rs)
- First responders, such as fire, law enforcement, and emergency medical personnel
- State/territory child care licensing agency
- Public health departments
- School district personnel, if your program is located within a school
- Community physicians who are disaster experts.
Making Your Emergency Response Plan
Working together and communicating what to do during an event is essential. Understanding everyone’s role during an emergency before the emergency occurs helps make the response procedure quicker and more efficient. Establishing responsibilities can be addressed during training sessions and planning meetings before an emergency or drill, to ensure staff are comfortable with the procedures.
Types of Emergency Responses
There are many types of emergencies. The key to remember is that each is a method to put effective barriers between you and a threat. The difference is in the types of threats and what kind of barrier is called for.
- Evacuating is a means to leave a dangerous situation or area (e.g., because of a fire).
- Sheltering in place is the use of a structure and its indoor atmosphere to temporarily separate you from a hazardous outdoor atmosphere (e.g., tornadoes, earthquakes, severe weather, landslides, or debris flow). It entails closing all doors, win

Figure 5.16 – These school-aged children are taking part in an earthquake drill. dows, and vents and taking immediate shelter in a readily accessible location.
- A lockdown is a shelter-in-place procedure that is used in situations with intruders or emergencies that involve potential violence. Lockdown requires children and adults to shelter in a safe room, lock doors, and remain quiet until the event is over.
See a sample evacuation plan and example blank plans for evacuation, shelter-in-place, and lockdown in Appendix G.
Building an Emergency Kit
Building an emergency supply kit is an important part of preparedness. This kit ensures that your program has sufficient supplies and food if you and the children need to shelter in place or evacuate in an emergency for at least 72 hours. Make sure that all items are up to date and not expired. Consider appointing someone to be responsible for routinely checking expiration dates of the food in your kit. Here are some items you might consider including in your kit:
- Emergency contact information for children and staff
- Attendance sheet
- Facility floor plan with evacuation routes outlined
- Printed directions to evacuation sites
- Medication list with dosing instructions for each child who takes medication
- Battery- or hand-powered weather radio
- Battery-powered walkie-talkies to communicate with staff
- Fully charged cell phone and charger
- Flashlight and batteries
- First aid kit
- Diapers, toilet paper, diaper wipes
- Sanitary wipes and hand sanitizer
- Non-latex medical gloves
- Dry or canned infant formula
- Bottled water
- Non-perishable food
- Work gloves
- Paper towels
- Blankets
- Alternative power source for electric medical devices (if needed)
- Whistle
- Wrench or pliers for the director to turn off utilities
- Matches in a waterproof container
- Games or activities to entertain children
Practice Your Plan
Practicing your emergency plan in advance helps everyone respond quickly and appropriately when an emergency situation arises. You won’t know if the plan works unless you try it out, so practice with all children and adults. If you have enrolled children or staff with special health care needs or disabilities, address these specific needs with community partners during practice.
Regular emergency drills, both announced and unannounced, help everyone become familiar with emergency procedures and activities. This can reduce panic and fear during an actual emergency, freeing participants to focus on how to evacuate, shelter in place, or lockdown.
Reunification Procedures
An effective method of reuniting children with their parents and guardians after an emergency is an often-overlooked component of an emergency plan, but it is very important. Including up-to-date emergency contact information for each child in your emergency kit can help provide structure around this process. Reunification procedures that should be communicated to families:
- Evacuation or shelter-in-place locations.
- What the program will do during a lockdown response.
- What families should do during a lockdown response.
- Who will contact families before, during, and after an emergency.
- How families will be contacted (e.g., text, email, phone call).
- Procedures if a child needs to be transported for medical care (e.g., who will accompany the child, where they will go).
It is important for programs to have procedures in place if children cannot be reunited with their families immediately. Roads close, care gets delayed, and work shifts go into overtime during emergencies for parents/guardians working in hospitals or as first responders. Having a plan in case you need to take care of a child overnight is a critical part of your reunification procedures.
What is Mitigation?
- What experiences do you have with first aid (giving or receiving)? How might this affect how you respond to a child getting injured?
- In addition to providing treatment for the injury, what else might an injured child need from a caring adult to feel emotionally safe?
Response
The goals of the response phase are to:
- Determine that an emergency is occurring.
- Determine appropriate response (evacuation, shelter in place, or lockdown).
- Activate the emergency response plan.
- Maintain communication with all staff and first responders.
- Establish what information needs to be communicated to staff, teachers, assistants, children, families, and the community.
- Provide emergency first aid as needed.
Refer to Figure 5.18 to see the process responses should follow.
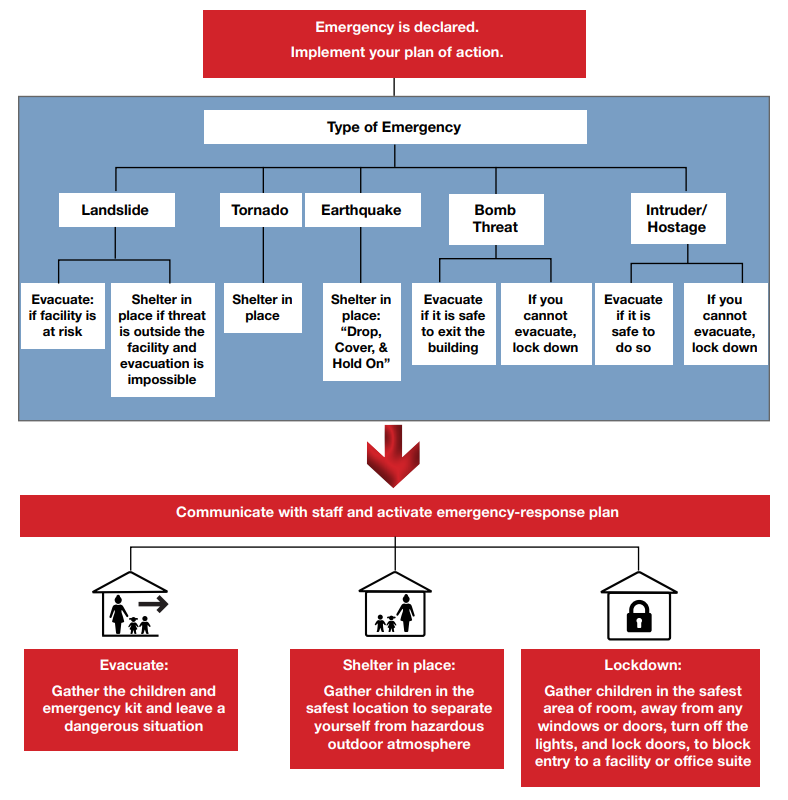
Response is directly related to preparedness—the more you prepare and practice your emergency response, the more efficient your response will be. After performing an emergency all involved parties should reflect upon how the drill went and provide feedback on what worked and what did not work. Updates and revisions to the plan and procedures should be made based on that feedback. Teachers should also discuss the drill with the children afterward, so the children can ask questions and understand what happened. [53]
Responding to Fires and Earthquakes
Earthquake Response – Drop, Cover, and Hold On
In order to be prepared to respond when there is an earthquake, teachers should identify safe places. A safe place could be under a sturdy table or desk or against an interior wall away from windows, bookcases or tall furniture that could fall on teachers and children. The shorter the distance to move to safety, the less likely that someone will be injured.
Everyone should practice drop, cover, and hold on. Have children go under a table (or desk if school-age) and hold on to one leg of the table or desk. Have them protect their eyes by keeping their head down.
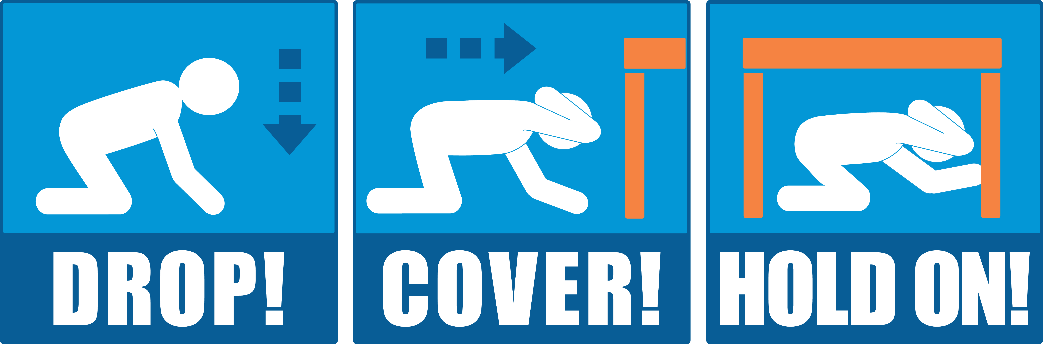
If an earthquake occurs inside, everyone should drop, cover, and hold on until the shaking stops. Teachers should then check everyone for injuries and look for things that may have fallen or broken that may now be a hazard (including fire). If evacuation is necessary, everyone should use stairs.If an earthquake occurs when people are outdoors, they should stay outside, moving away from buildings, trees, streetlights and overhead lines, crouching down and covering their heads. Many injuries occur within ten feet of the entrance to buildings. Bricks, roofing and other materials can fall from buildings, injuring persons nearby. Trees, streetlights and overhead lines may also fall, causing damage or injury. [55]Fire Response Programs should have clear escape routes drawn on floor plans that note all doors, windows, and potential barriers. Every room should have two escape routes, which should be kept open/accessible at all times. And the evacuation site (and a backup evacuation site/temporary shelter) should be identified. These plans should be posted in every room and all program staff and families should be familiar with these (and regularly practice them).If a fire occurs, 911 should be called immediately. A designated staff person should get the current record of the attendance and the emergency contact information for all of the children. As the children and staff evacuate, each should be noted so that no one is left behind. No one should go back into the building once it has been evacuatedEveryone should proceed to the evacuation site or temporary shelter. For children that cannot yet walk (infants, toddlers, or children with mobility impairments) a large wagon, or emergency crib on wheels, or similar equipment can be used for evacuation.
Recovery
The recovery phase refers to the actions taken from the time the emergency ends until the needs of staff, children, and families are met. It includes helping affected families resume their daily activities and helping all those affected cope with the aftermath of the emergency. Recovery can last for a few days, weeks, months, or even years. The goals of the recovery phase are to:
- Rebuild your facility or home if necessary, and restore services as quickly as possible.
- Meet the needs (physical, health, emotional) of children, families, and staff.
- Provide a supportive and caring environment that brings normalcy back into children’s lives.
Incorporating recovery resources into your emergency-preparedness plan can help you reach these goals more quickly while providing mental health and emotional support to children, families, and staff.
Reunification
Safely returning children to their families after an emergency begins to bring children and families back to normalcy. Preparing for this by keeping up-to-date emergency contact information for each child in your emergency kit can help provide structure around this process. As discussed in previous chapters, make sure you are communicating with families throughout the emergency, if possible. This communication may help the reunification process begin more quickly, as families may be able to safely pick up their children sooner.
Damage and Needs Assessment
A damage assessment of your facility or home after an emergency is crucial for your early childcare education program to open again. Assessments will differ based on the type of emergency your program, center, or home experienced. Resources to help you complete a damage assessment:
- Flooding: usa.childcareaware.org/flooding/
- Hurricane: usa.childcareaware.org/hurricanes
- Tornado: www.ready.gov/tornadoes
Ensure that your early childcare education program has been given the all-clear from licensing and emergency officials before reopening.
Continuation of Services
After conducting your damage and needs assessment, an action plan is needed for how your early childcare education program will resume services to families. Use community resources, they can connect you to resources that can help you re-open your early care and education program or provide children with temporary child care.
Mental Health and Emotional Needs
Mental health support is a high priority after an emergency. Children and adults who have experienced stress and/or loss, either at the child care program or at home, may have difficulty coping. By offering a safe place and resources like mental health consultants, early care and education programs support children, families, and staff coping with fear, anger, and grief and help them resume their lives in a healthy way.
Coping with Disaster, Emergencies, and Tragedies
Keep in mind the following:
- Everyone who sees or experiences an emergency is affected by it in some way.
- It is normal to feel anxious about your own safety and that of your family and close friends.
- Profound sadness, grief, and anger are normal reactions during or after an emergency.
- Everyone has different needs and different ways of coping.
- Acknowledging feelings and focusing on your strengths and abilities can help recovery.
- Difficult memories of the disaster can be triggered by certain loud noises, weather events, or news clips from the emergency. This may be true even years later.
Engaging Families in Supporting Their Children After a Disaster
Further resources about how families can help children cope after a disaster:
- This webpage can help guide conversations with children about tragedies and emergencies.
- This webpage has several resources for helping children cope with both natural disasters and emergencies.
- This tip sheet helps explain why children may be acting differently in response to an emergency or disaster.
- This tip sheet provides examples and explanations about how to talk to children when they are coping after a disaster.
Summary
When early care and education programs have staff that are knowledgeable about how to identify and respond to injuries and emergencies, they are prepared to keep children safe. This chapter provided basic information on responding to injuries. This content is not a replacement for the certification that teachers and other staff members should pursue.
It’s important to remember that emergencies can take many forms. Early care and education programs should be ready to act in the event of any type of emergency by being prepared and by knowing how to respond and recover. [56]
Chapter 5 Review
Resources for Further Exploration
- Emergency First Aid Guidelines for California Schools (NOTE: This was written for California child care providers but is still relevant for Minnesota)
- Learn CPR by the University of Washington School of Medicine
- Basic Life Support Participant’s Manual
- Public Counsel Law Center: Early Care and Education Law Project’s Guidelines for Releasing Children (NOTE: This was written for California child care providers but is still relevant for Minnesota)
- Emergency Preparedness Manual for Early Childhood Programs
- American Academy of Pediatrics Children and Disaster
- California Childcare Health Program, Health, and Safety Notes (NOTE: This was written for California child care providers but is still relevant for Minnesota)
- Child Care Aware® of America: Emergency Preparedness website
- Evacuation for persons with disabilities
- Ready.gov
- How to Plan for Emergencies & Disasters A Step-by-Step Guide for California Child Care Providers (NOTE: This was written for California child care providers but is still relevant for Minnesota)
- Sesame Street in Communities Emergency Preparedness Page
- Emergency Preparedness Manual for Early Childhood Programs
References:
[2] Nalle, M. (2008). First Aid Kits for Child Care Providers. Retrieved from http://www.earlychildhoodnews.com/earlychildhood/article_view.aspx?ArticleID=322
[51] Public Counsel Law Center. (2010). Guidelines for Releasing Children. Retrieved from http://www.publiccounsel.org/tools/assets/files/Guidelines-for-Releasing-Children-Updated-May-2010.pdf
[52] Public Counsel Law Center. (2010). Guidelines for Releasing Children. Retrieved from http://www.publiccounsel.org/tools/assets/files/Guidelines-for-Releasing-Children-Updated-May-2010.pdf
[53] Disaster Planning, Training and Communication/Emergency and Evacuation Drills by the Office of Head Start is in the public domain.
[55] Image by Cpl. Dylan Chagnon is in the public domain.
[57] Children walking with guardian is free for commercial use.
- Emergency by Wikimedia Foundation Inc. is licensed under CC BY 3.0 ↵
- California Health and Human Services Authority. (2013). Emergency First Aid Guidelines for California Schools. Retrieved from https://emsa.ca.gov/wp-content/uploads/sites/71/2017/07/EMSC_Interactive_Final.pdf ↵
- McLain, K., O'Hara-Leslie E., and Wade, A. (n.d.). Safety and Injury Prevention. [licensed under CC BY 4.0]. https://courses.lumenlearning.com/suny-home-health-aide/chapter/safety-and-injury-prevention/ ↵
- Mayo Clinic. (2023). Cuts and scrapes: First aid. Retrieved from https://www.mayoclinic.org/first-aid/first-aid-cuts/basics/art-20056711 ↵
- Image: Minor Burn-first aid- series procedure by NIH is in the public domain. ↵
- McLain, K., O'Hara-Leslie E., and Wade, A. (n.d.). Safety and Injury Prevention. [licensed under CC BY 4.0]. https://courses.lumenlearning.com/suny-home-health-aide/chapter/safety-and-injury-prevention/ ↵
- Mayo Clinic. (2023). Cuts and scrapes: First aid. Retrieved from https://www.mayoclinic.org/first-aid/first-aid-cuts/basics/art-20056711 ↵
- Mayo Clinic Staff. (2020). Fractures. Retrieved from https://www.mayoclinic.org/first-aid/first-aid-fractures/basics/art-20056641 ↵
- Mayo Clinic Staff. (2018). Head Trauma: First aid. Retrieved from https://www.mayoclinic.org/first-aid/first-aid-head-trauma/basics/art-20056626 ↵
- Haas, R.E. (2019). Concussions. Retrieved from https://kidshealth.org/en/parents/concussions.html?WT.ac=ctg#catemergencies ↵
- Office of Head Start. (2022). Giving First Aid for Your Child’s Oral Injuries. [public domain]. https://eclkc.ohs.acf.hhs.gov/publication/giving-first-aid-your-childs-oral-injuries ↵
- Tellado, M.P. (2019). Nose Bleeds. Retrieved from https://kidshealth.org/en/parents/nose-bleed.html?WT.ac=ctg#catemergencies ↵
- Mayo Clinic Staff. (2017). Nosebleeds: First aid. Retrieved from https://www.mayoclinic.org/first-aid/first-aid-nosebleeds/basics/art-20056683 ↵
- Mayo Clinic Staff. (2018). Insect bites and stings: First aid. Retrieved from https://www.mayoclinic.org/first-aid/first-aid-insect-bites/basics/ART-20056593?p=1 ↵
- Mayo Clinic Staff. (2018). Animal bites: First aid. Retrieved from https://www.mayoclinic.org/first-aid/first-aid-animal-bites/basics/ART-20056591?p=1 ↵
- Hirsch, L. (2018). Bites and Scratches. Retrieved from https://kidshealth.org/en/parents/bites.html?WT.ac=ctg#catemergencies ↵
- Mayo Clinic Staff. (2020). Snakebites: First aid. Retrieved from https://www.mayoclinic.org/first-aid/first-aid-snake-bites/basics/art-20056681 ↵
- Mayo Clinic Staff. (2018). Human bites: First aid. Retrieved from https://www.mayoclinic.org/first-aid/first-aid-human-bites/basics/art-20056633 ↵
- Mayo Clinic Staff. (2017). Foreign object swallowed: First aid. Retrieved from https://www.mayoclinic.org/first-aid/first-aid/basics/art-20056707 ↵
- Mayo Clinic Staff. (2017). Foreign object in nose: First aid. Retrieved from https://www.mayoclinic.org/first-aid/first-aid/basics/art-20056610 ↵
- Mayo Clinic Staff. (2017). Foreign object in ear First aid. Retrieved from https://www.mayoclinic.org/first-aid/first-aid/basics/art-20056709 ↵
- Mayo Clinic Staff. (2017). Foreign object in eye: First aid. Retrieved from https://www.mayoclinic.org/first-aid/first-aid/basics/art-20056645 ↵
- Mayo Clinic Staff. (2017). Foreign object swallowed: First aid. Retrieved from https://www.mayoclinic.org/first-aid/first-aid/basics/art-20056604 ↵
- NIH. (2023). Recognizing medical emergencies. [public domain].https://medlineplus.gov/ency/article/001927.htm ↵
- NIH. (2023). Stopping bleeding with direct pressure. [public domain]. https://medlineplus.gov/ency/imagepages/1067.htm ↵
- NIH. (2023). Stopping bleeding with direct pressure. [public domain]. https://medlineplus.gov/ency/imagepages/1067.htm ↵
- WebMD. (2020). Choking in Children. Retrieved from https://www.webmd.com/first-aid/choking-in-children#1-1 ↵
- NIH. (2023). Choking first aid-infant under 1 year-Part 1. [public domain].https://medlineplus.gov/ency/presentations/100221_1.htm ↵
- NIH. (2023). Choking first aid-infant under 1 year-Part 1. [public domain].https://medlineplus.gov/ency/presentations/100221_1.htm ↵
- NIH. (2023). Choking first aid-infant under 1 year-Part 1. [public domain].https://medlineplus.gov/ency/presentations/100221_1.htm ↵
- NIH. (2023). Choking first aid-infant under 1 year-Part 2. [public domain].https://medlineplus.gov/ency/presentations/100221_2.htm ↵
- NIH. (2023). Choking first aid-infant under 1 year-Part 4. [public domain].https://medlineplus.gov/ency/presentations/100222_4.htm ↵
- NIH. (2023). Choking first aid-infant under 1 year-Part 5. [public domain].https://medlineplus.gov/ency/presentations/100222_4.htm ↵
- NIH. (2023). Choking first aid-infant under 1 year-Part 5. [public domain].https://medlineplus.gov/ency/presentations/100222_4.htm ↵
- NIH. (2023). Choking first aid-infant under 1 year-Part 1. [public domain].https://medlineplus.gov/ency/presentations/100221_1.htm ↵
- NIH. (2023). Chest compressions. [public domain]. https://medlineplus.gov/ency/presentations/100216_2.htm ↵
- NIH. (2023). CPR infant series - Infant not breathing. [public domain]. https://medlineplus.gov/ency/presentations/100216_3.htm ↵
- NIH. (2023). CPR infant series - Check for responsiveness. [public domain]. https://medlineplus.gov/ency/presentations/100216_1.htm ↵
- NIH. (2023). Chest compressions. [public domain]. https://medlineplus.gov/ency/presentations/100216_2.htm ↵
- NIH. (2023). CPR infant series - Infant not breathing. [public domain]. https://medlineplus.gov/ency/presentations/100216_3.htm ↵
- NIH. (2023). Child 1 to 8 years old series - check for responsiveness. [public domain]. https://medlineplus.gov/ency/presentations/100215_1.htm ↵
- NIH. (2023). Child 1 to 8 years old series - chest compressions. [public domain]. https://medlineplus.gov/ency/presentations/100215_2.htm ↵
- NIH. (2023). Child 1 to 8 years old series - child not breathing. [public domain]. https://medlineplus.gov/ency/presentations/100215_3.htm ↵
- NIH. (2023). Child 1 to 8 years old series - check for responsiveness. [public domain]. https://medlineplus.gov/ency/presentations/100215_1.htm ↵
- NIH. (2023). Chest compressions. [public domain]. https://medlineplus.gov/ency/presentations/100216_2.htm ↵
- NIH. (2023). Child 1 to 8 years old series - child not breathing. [public domain]. https://medlineplus.gov/ency/presentations/100215_3.htm ↵
- Recovery Position by Rama is licensed under CC BY-SA 3.0 FR. ↵
- NYC Health. (2017). Guidelines for Developing and Completing Lost Child Prevention and Retrieval Procedures Required by New York City Health Code Section 47.11. Retrieved from https://www1.nyc.gov/assets/doh/downloads/pdf/dc/cc-lost-child.pdf ↵
- Digicode by D4m1en is licensed under CC BY-SA 3.0 ↵
- Image by Spc. Noelle Wiehe is in the public domain. ↵
- Students Practice Earthquake Drills by KOMUnews is licensed under CC BY 2.0 ↵
- Office of Head Start. (2020). Emergency Preparedness Manual for Early Childhood Programs. [public domain]. https://eclkc.ohs.acf.hhs.gov/sites/default/files/pdf/emergency-preparedness-manual-early-childhood-programs.pdf ↵
- Office of Head Start. (2020). Emergency Preparedness Manual for Early Childhood Programs. [public domain]. https://eclkc.ohs.acf.hhs.gov/sites/default/files/pdf/emergency-preparedness-manual-early-childhood-programs.pdf ↵
- Image by U.S. Dept. of Homeland Security is in the public domain. ↵
- OSHA. (n.d.). Earthquake Preparedness and Response. [public domain]. https://www.osha.gov/earthquakes ↵
- Office of Head Start. (2020). Emergency Preparedness Manual for Early Childhood Programs. [public domain]. https://eclkc.ohs.acf.hhs.gov/sites/default/files/pdf/emergency-preparedness-manual-early-childhood-programs.pdf ↵
