Practice Activity 2: Creating a Folder Structure

Prefer to watch and learn? Check out this video tutorial.
Complete the following Practice Activity and submit your completed project
- In this activity, we will use Windows to create a folder structure to store your files for class. It is important to keep your files organized so that you can find them when you need them. Saving, accessing, and uploading files is critical to your success in this course. This assignment will assist you in keeping your files organized throughout this course.
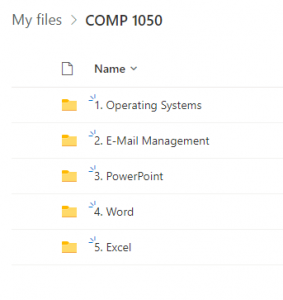
- Using Windows, create the file structure on one of the following: NSCC One Drive, computer, or laptop. Your top folder should be COMP 1050.
- There are a few different ways to create a new folder in Windows.
- In File Explorer, click the new folder icon in the upper left hand corner
- Use the shortcut key CTRL+Shift+N
- Right click the white area of the File Explorer Window, and select New, Folder.
- Your completed file structure should look something like this:

Note: Some students like to put a number in front of the folder so that they display in chronological order. Other students like to abbreviate the unit and chapter names. The file structure is for you, so use names and logic that makes sense to you.
Helpful Hints:
- After you type the name of the folder, press enter.
- Use the File Explorer Navigation Pane to expand each file folder. If the arrow, or carrot is pointing down, the file is expanded. This will allow you to see the folder contents.
- To rename a folder, right click on the folder. In the shortcut menu, choose Rename. Start typing the new name, and then hit Enter on your keyboard.
- To delete a folder, right click on the folder. In the shortcut menu, choose delete.
Media Attributions
- Practice It Icon by Jessica Parsons is licensed under a CC BY (Attribution) license

