
Word Practice 3

Prefer to watch and learn? Check out this video tutorial.
Complete the following Practice Activity and submit your completed project.
For Word Practice 3, we will use Word to create a resume that will be used to apply for a Help Desk position at the NSCC Help Desk. Key skills in this practice are creating and modifying tables, and sharing documents online.
- Launch Microsoft Word. Click Blank Document.
- Show formatting marks and show the ruler.
- Save the document as Yourlastname_Yourfirstname_Word_Practice_3 in your Word Folder.
- On the Insert Tab, in the Header and Footer group, Choose Footer, then Edit Footer. In the Header and Footer Toolbar, Design Tab, in the Insert Group, choose the arrow under Document Info. Add the file name to the footer. Exit the footer.
- At the top of your document, Insert a 2 X 4 table. To insert a table, navigate to the Insert Tab, Tables Group, and drag your cursor in the grid to create a table with two columns and four rows.
- Beginning with the first cell in the table, type each of the following:
-
- PROFESSIONAL OBJECTIVE [Press Tab]
- Desire a Help Desk Assistant position where I can use my expertise in providing desktop and application support to users. [Press Tab]
- QUALIFICATIONS [Press Tab]
- A results-oriented help desk specialist experienced in providing in-depth customer support. [Press Enter]
- Demonstrated ability in diagnosing problems. [Press Enter]
- Extensive end-user training experience. [Press Enter]
- Capable of working with a diverse customer base. [Press Enter]
- Experienced in different operating systems and applications. [Press Tab]
- In the third row, type WORK EXPERIENCE and press Tab.
- Using the Insert Text from File function, insert the text from Text_Word_Practice3 (downloaded file from Brightspace). To insert text from file navigate to the “Insert” tab and select the drop down arrow beside Object in the Text group.
- Remove the blank line at the end of the inserted text.
- In the fourth row, in the column to the left, type EDUCATION AND CERTIFICATIONS and press Tab.
- Type the following, pressing Enter at the end of each line except the last one:
-
- University of Youngstown, Youngstown, OH
- Bachelor of Science degree in Computing, 2020
- Microsoft Certified Solutions Expert (MCSE)
- CompTIA A+
- CompTIA Network+
- CompTIA Security+
-

. Select all the text in the cell to the right of QUALIFICATIONS, apply bullets, and decrease the indent. The bullets and decrease indent are located on the Home Tab, Paragraph Group.
- Use the Format Painter (located on the Home tab, Clipboard group) to copy the bullets and the decrease indent to the description of the work experience.
- In the text next to EDUCATION AND CERTIFICATIONS, apply bullets to the list. Ensure the bullets align with the other bullets in the document. Increase the indent for the Bachelor of Science Degree.
- Drag the table vertical border between the two columns until the white arrow on the ruler is at approximately 1.5 inches on the horizontal ruler.
- Select the text in the first column. Ensure all of the text in the first column is left aligned.
- On Table Tools, Layout Tab, Cell Size group, using the Width box down spin arrow, set the column width to 1.4 for the first column.
- Click Auto-fit and select Auto-fit Window.
- Use the one-click Row/Column insertion button to insert a new row above EDUCATION AND CERTIFICATIONS.
- In the left cell of the new row and type TECHNICAL SKILLS and press Tab.
- In the second column, type the following, pressing Enter at the end of each line, except the last one:
-
- Platforms: Windows 10, MacOS, Unix
- Applications: Microsoft Office 365, Norton/McAfee Anti-Virus, Norton Internet Security, Photoshop
- Strong knowledge of LAN and WAN technologies
- Solid knowledge of Oracle Help Desk system
- Apply bullets to the Technical Skills list. Ensure the bullets align with the other bullets in the document.
- In the top row of the table change the top and bottom cell margins to 0.04. Cell margins are on the Table Tools Layout Tab, Alignment Group. Remove any extra spaces or lines in the first row of the table.
- At the top of the document, insert a row above the first row. On the Table Tools Layout Tab, in the Rows & Columns Group, choose Insert Above.
- Select the entire first row that you just added. On the Table Tools Layout Tab, Merge the two cells in the top row.
- In the first row of the table type:
-
- Matt Smith [Press Enter]
- (867) 555-1012 [Press Enter]
- 1254 Success Way, Phoenix, AZ 85320 [Press Enter]
- msmith@pacifica.net[Press Tab]
Ctrl + Tab moves within the cell.
- Select Matt Smith and use the mini-toolbar to bold and italic and change the font size to 14.
- Select all of the text in the first row. On the Home tab, expand the paragraph settings of the Paragraph group and set Spacing Before and After to 0 pt. Remove any extra line spacing.
- With all of the text still selected in the first row, center all of the text.
- Beginning in the second row, italicize and bold all of the headings in the left-hand column.
- In the cell to the right of WORK EXPERIENCE, italicize and bold the job title ‘Help Desk Technician’.
- In the cell to the right of EDUCATION AND CERTIFICATIONS, bold University of Youngstown. Place cursor at line beginning with Bachelor, on the Home tab, expand the paragraph settings of the paragraph group and change the Spacing After to 12 pt. If necessary, deselect the Don’t add space between paragraphs of the same style box.
Leaving this selected will result in no space being added. - In the cell to the right of WORK EXPERIENCE, select Help Desk Technician and set the spacing to 12 pt. after. If necessary, deselect the Don’t add space between paragraphs of the same style box.
- Select the entire table and remove all the borders. There are a few ways to do this:
-
- Click the cross hair indicator in the upper left hand corner of the table
- Start at the top of the table and click and drag to select the entire table
- Use the shortcut key CTRL + A
- On the Table Tools, Design Tab, in the Border Group, select No Border.
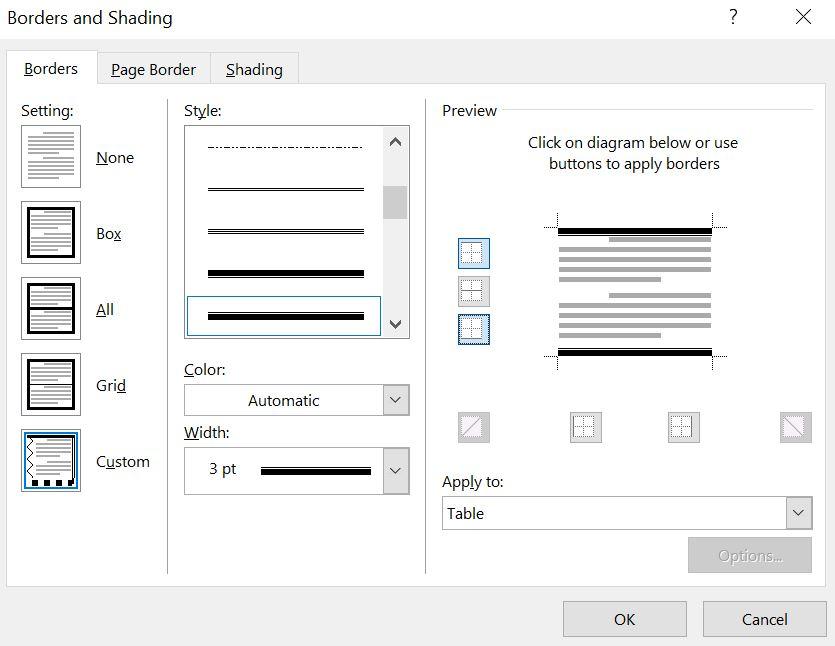
- With the table still selected, On the Table Tools, Design Tab, in the Border Group, select Borders arrow and select Borders and Shading. In the borders and shading dialog box, apply the “thick upper line and thin lower line” table style to the top of the table and the “thin upper line and thick lower line” to the bottom of the table.
- In the line beginning with (867) 55-1012, change the Spacing Before to 12 pt (found on Layout tab).
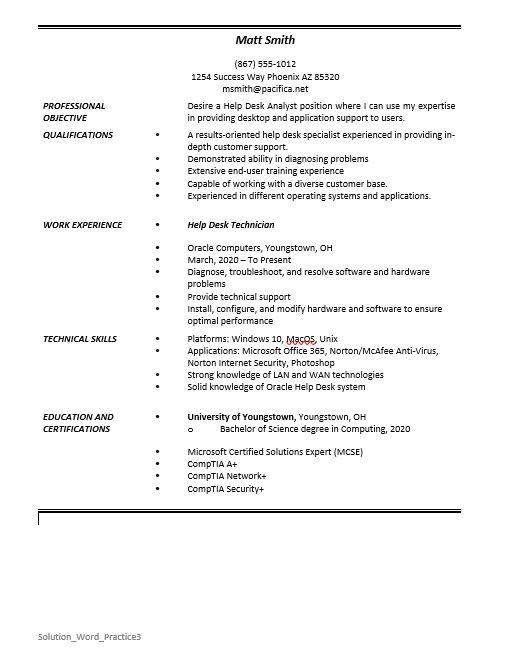
- In Backstage View, display the print preview under Print. If necessary, exit Backstage view and make modifications. Compare your documents to the image below.
- In Backstage View, under Info, show advanced properties and type in the tags box ‘resume’.
- Type your course name and course code (Business Computer Applications, COMP 1015) in the Subject box and be sure your name is in the Author box.
- Upload your file to the appropriate assignment box on Brightspace.
Media Attributions
- Practice It Icon by Jessica Parsons is licensed under a CC BY (Attribution) license
- Woman in black blazer by Anna Shvets is licensed under a Pexels License license
- Woman in wheelchair by Jordan Nicholson/Disability:IN is licensed under a CC BY-ND (Attribution NoDerivatives) license
A formal document that provides an overview of professional qualifications for an employment opportunity
The bottom margin of each page
An arrangement of information organized into rows and columns
The intersection of a row and column in a table
A feature in Word where you can see suggestions from LinkedIn to enhance your resume
A feature in Word tables that allows users to insert a new row or column by pointing to the desired location and then clicking once
