
Editing Best Practices
NSCC editing best practices are based on the Web Content Accessibility Guidelines (WCAG). Building the WCAG standards into our creation guidelines helps ensure the content we are creating is accessible. This chapter presents an overview of the main editing tools that should be used. More detail about how to create using these tools is included in the following sections.
Design instructions for your content come from the Pressbooks book’s style sheet. We are able to achieve a consistent look and feel in the presentation of the content through the use of hierarchical header tags and layout(presentation) options in the edit menu bar. While editing, your goal is to apply these options consistently with the understanding that we can change the style – through modifying the style sheet – and have the style changes reflected globally throughout the book.
Edit with accessibility considerations factored into your text:
- Text is entered with upper and lower case characters.
- All caps (when used) is applied from the style sheet (CSS).
- Do not use the underline text feature. Apply italic or bold to differentiate text.
- Do not not use extra spaces.
- Do not use extra paragraph returns
- Every space and paragraph return is read as a distinct character by a screen reader.
Clean Files and Text
When you copy text from a website or word processing file, the copied text has hidden HTML coding that we do not need or want in our Pressbook’s chapters. Our goal is to copy or import text without this hidden coding.
Clean Text – Option #1
- Use the Text Editor option.
- Paste copied text into the TEXT editor screen to strip out unwanted coding.
- Any HTML coding in the chapter will be visible in this view.
- Change back to the VISUAL editor screen to edit.
Clean Text – Option #2
- Clean your word processing file before importing.
- Use Ctrl + A to select all text in a document and then click the Clear All Formatting button to remove the formatting from the text (aka character level formatting.)
- Use Search and Replace to remove extra spaces and extra paragraph returns.
- Spacing instructions should be set in the style sheet.
header Tags
Apply header tags to your content. Headers allow the reader to visual scan content and move to the section that they want to read. Headers are even more important for readers who use text to speech tools to navigate the text.
Applying the right tag is essential for providing accurate navigation to the user of assistive technology. How the header looks is not important at this stage. The style – how the header looks- can be changed globally by making changes to the books style sheet. Our goal in the creation and editing process is to apply headers following the hierarchical tagging rules.
Hierarchical Tagging
H1 tags are only used once in the chapter title.
- Hierarchical tagging
- Begin with H2 header tags.
- H2 must be used in your chapter before you can use a H3 header.
NSCC Header Tags
- H1 – for the chapter title [applied automatically]
- H2 – for major headings
- H3 – for major sub headings.
- H4 – use only when really necessary
Use the Built-in Tools
Using the built-in tools will help ensure that the completed book meets accessibility requirements. For example when you use the built-in bulleted list tool, the HTML coding applied to the creation of the list will ensure that screen readers understand that this is an ordered list.
Footnotes
Use the built-in footnote tool to include references for copied content. This attribution method removes the in-text citation from the reading of the sentence while keeping the reference clearly attached to the content and allowing the reference to be read when it is meaningful to the reader.
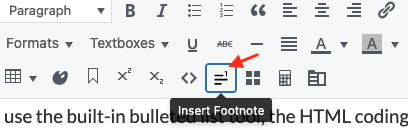
The footnote will be visible in the Visual editor screen. It will appear in the text between opening and closing square brackets that contain the word footnote.
[ footnote ]Enter your footnote content here.[ /footnote ][1]
In the web book the footnote is displayed as a superscript reference linked to a readable reference at the bottom of the page. The reference can also be read with the text by highlighting the superscript number to reveal the reference. Try it in the example above.
Embed URLS in Meaningful text
Hyperlinks to external or internal content should always be presented as a link embedded in meaningful text.
- click here – better than a url but not meaningful
- this resource – better than a url but not meaningful
Here is an example of a URL embedded in meaningful text:
- For more information read the WCAG blog post: Writing Meaningful Link Text
Lists
Use the Bulleted List option to create bulleted lists compatible with text to speech tools.
- You can check the existing lists in your chapters to make sure they are were created using the bullet list tool.
- When you insert your cursor in text that was created using the bulleted list option — the menu bar bullet list option will become highlighted.
- If you are comfortable with HTML, switch to the Text Editor screen to view the HTML instructions for an unordered list.

Creating a Bulleted List
- Place the cursor where you want the list to appear.
- Click on the Bullet list icon. Write your list item. Alternatively, you can write a list item first, highlight it, and then select the Bullet list icon to insert a bullet.
- When finished with your first list item, press the Enter key on your keyboard to add another list item.
Add Alt Text
Add alt text to images so that the image can be read by a screen reader.
- Example of a footnote attached to text. ↵
