Image Long Descriptions
Long descriptions
Complex images, especially charts or graphs, will often require descriptions longer than 125 characters and it may not always be possible to add an explanation to the surrounding text. In this case, you can provide a link to a longer image description or an accessible table. One way to do this is to create a section for long descriptions in your resource and use links to allow people to easily switch between the image and its description and back again.
How to set up a long description for an image in Pressbooks
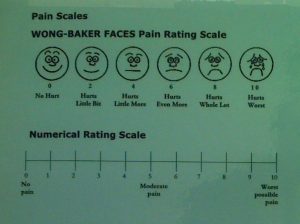
Figure 1.1 shows an image from Introduction to Sociology – 2nd Canadian Edition that requires a longer description than what can fit in an alt tag. As such, at the end of the caption, there is a link to the image’s description.
Anyone using this textbook can access this image description by clicking on the [Image description] link, which will take them to the image description at the end of the chapter (or by flipping to the end of the chapter in the print version). This will also work for people using screen readers who are navigating through the book with a keyboard.
Curious about how this works? Try clicking on the [Image Description] link in the caption of Figure 1.1.

Adding a long description to an image in Pressbooks can be complicated, but the following four steps will help guide you through the process.
Step 1: Add an alt tag
Even though you will be providing a long description, the image still needs an alt tag. In the Alternative Text field in the image editor, provide a brief image description (only a few words), and state that there is an image description available.
Example alt tag: Wong-Baker Faces pain rating scale. Image description available.
Step 2: Create an end chapter called Long Descriptions.
- Insert the image description in the new the chapter
- Create a “Image Descriptions” heading at the end of the chapter. All image descriptions will be added under this heading in the order that the images appear in the chapter.
- Under the “Image Descriptions” heading, insert the image’s figure number followed by the image description.
Example:
Figure 1.1 image description: The Wong-Baker Faces pain rating scale uses cartoon faces to illustrate the different levels of pain that correspond to a numbered scale from 1 to 10. Zero is smiling, 2 is a small smile, 4 is a straight face, 6 is a slightly sad face, 8 is a big sad face, and 10 is a bigger sad face that is crying.
Step 3: Link to the image description from the image’s caption
Provide a link to the image description in the caption of the image. Because the description will be on the same page of the image, you will be providing a same-page link using anchor tags.
- Come up with a unique ID for the image description, which will allow you to link directly to the description in the chapter. In this case, we used “fig1.1”. (The ID can be whatever you want, but if you have multiple images that require long descriptions, it is best practice to establish a convention for creating IDs to keep them simple and consistent. Note that IDs are case sensitive.)
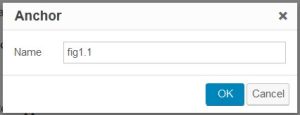
- Insert the ID using the “Anchor” button at the beginning of the image description.
- Place your cursor at the beginning of the image description entry.
- Select the “Anchor” button from the WYSIWYG visual editor. The button appears in the third row and looks like a ribbon.

- A dialogue box will pop up asking you to provide a name for the anchor. Insert the ID you created and select OK.

- Go back to your image. At the end of the caption, add “[Image Description]” to use for the link text.
- Link the [Image Description] text to the anchor you created.
- Select the [Image Description] text.
- Select the “Insert/edit link” button from the WYSIWYG Visual editor. The button appears in the first row and looks like a chain link.
- A dialogue box will pop up asking you to provide a URL. Insert a number sign (#) followed by the ID you created and select the “Apply” button.

The following table displays how the caption will look in the visual editor view and in the image editor view.
| Visual editor view | Figure 1.1 The Wong-Baker Faces pain rating scale helps health care providers assess an individual’s level of pain. What might a symbolic interactionist observe about this method? [Image Description] |
|---|---|
| Image editor view | Figure 1.1 The Wong-Baker Faces pain rating scale helps health care providers assess an individual’s level of pain. What might a symbolic interactionist observe about this method? <a href=”#fig1.1″>[Image Description]</a> |
Step 4: Link the image description back to the image
Insert a link at the end of the image description that takes users back to the original image. This will make it easy for people to navigate back to their spot in the chapter after accessing the image description.
Example:
Figure 1.1 image description: The Wong-Baker Faces pain rating scale uses cartoon faces to illustrate the different levels of pain that correspond to a numbered scale from 1 to 10. Zero is smiling, 2 is a small smile, 4 is a straight face, 6 is a slightly sad face, 8 is a big sad face, and 10 is a bigger sad face that is crying. [Return to Figure 1.1]
- To link back to the image, you will need a new unique ID. In this case, we used “retfig1.1”.
- Insert the ID using the “Anchor” button right before the image in the chapter.
- Link the [Return to Figure 1.1] text to the anchor you just created.

