
Making a Peripheral Blood Smear
Learning Objectives
- Prepare blood specimens for microscopic evaluation by applying the principles of bright field microscopy and
physical/chemical principles of staining. - Prepare blood smears for evaluation. Assess the quality of the blood smear.
- Proper identification of the patient on the blood smear.
CSMLS Competency Profile References
- Category 2: Data specimen collection and handling – 2.07; 2.11; 2.12
- Category 3: Analytical processes – 3.13
- Category 5: Quality management – 5.05
- Category 6: Critical thinking – 6.04; 6.06
Principle[1][2]
A properly prepared blood smear is essential in ensuring an accurate, reliable assessment of blood cell morphology. Although most automated blood analyzers can make a proper blood smear, the manual wedge method is still a common smear preparation technique performed in laboratories today.
A small drop of EDTA-anticoagulated blood or capillary blood is placed on a clean microscope slide and spread across the slide creating a thin smear with a rounded “feathered edge’. Once the blood smear dries it can be stained using a common Wright stain (modified Romanowsky stain). A well-made and suitably stained blood smear allows the laboratory technologist to accurately assess the cellular morphology.
Materials
- High quality, beveled-edged, precleaned, frosted-end, glass microscope slides
- Wooden applicator sticks or capillary tubes(non-heparinized)
- EDTA-anticoagulated blood sample
- Kim wipes/towels
- Light microscope
- Lead pencil
- Sample Rack
- Gloves
- Biohazard Bucket
Sample Type
- Freshly collected in EDTA (Lavender topped collection tube, via venipuncture):
- Chelates the calcium ions in blood and prevent clotting from occurring.
- Prevent platelets from clumping and allow for good quality platelet evaluation.
- Fresh capillary blood from a finger/heel stick.
Safety Considerations
- All specimens received in the lab must be regarded as potentially infectious so follow safe practices.
- Refer to regulations and safety precautions in the student lab manual located in each student lab.
Procedure
- Using a lead pencil, label the frosted end of a slide with patient’s full name, Accession Number and MRN.
- Place the slide on a flat surface and using a wooden applicator stick or glass capillary tube, place a small drop of blood on the slide just below the frosted end.
- Using another glass slide as a “spreader” or “pusher”, place it in front of the drop of blood making sure to keep the spreader slide at a 30 to 45-degree angle.
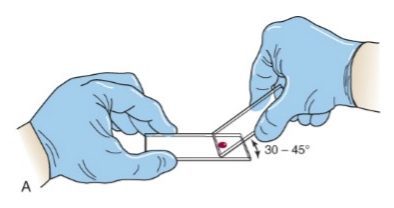
- Draw the spreader slide back through the drop of blood, making sure you pick up the whole drop of blood, and allow the blood to fan out across the edge of the spreader slide.
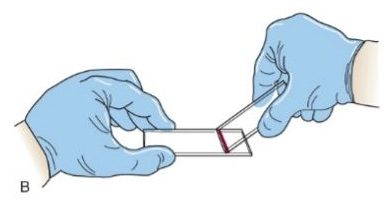
- Push the spreader slide forward, spreading the blood across the length of the slide. It is very important to maintain a constant speed, angle and pressure as you spread the blood. Note: Steps 4 and 5 are performed in one smooth back and forward motion.

- Examine the smear to ensure it is suitable before applying a stain.

Procedural Notes
- Ideally, it is best to make smears on all CBC’s ordered in the event they may be required later. Some lab may have different protocol.
- It is important that the whole drop of blood is picked up by the spreader.
- Ensure that the blood drop spreads across the entire slide before spreading the smear or it will not be wide enough.
- The angle of the spreader, the size of the blood drop, the speed of spreading, and a consistent pressure on the spreader are all important in making a good smear preparation.
- In the event you cannot stain a blood smear immediately, you can fix the smear by placing it methanol for about 1 minute. This will help maintain the integrity of the slide until it can be stained.
- Do not use a ‘sharpie” to write your patient information on the slide because it will come off if submerged in methanol (fixative).
- Never blow on the slide or wave it in the air to dry it.
Quality
- Ideally the blood smear should be made within 2-3 hours of collection to maintain cellular integrity.
- High quality, pre-cleaned, beveled-edged microscopic slides with frosted end are recommended.
- Characteristics of a well-made smear
- Smear should be about two thirds to about three fourths the length of the slide.
- Smear should have a slightly rounded “feather edge” which should have a rainbow appearance when held up to the light.
- The lateral edges of the blood smear should be visible from the edges of the slide.
- Smear should not have any irregularities such as holes or streaks.
- The smear should not be too thick or thin.
- Whole drop of blood must be picked up and spread.
Sources Of Error
- Allowing blood from EDTA tubes to sit for longer than 5 hours at room temperature may cause the development of blood cell artifacts, such as, echinocytic (burr cells) or spherocytic (spherocytes). Necrobiotic (degenerating), or vacuolated neutrophils may be seen.
- Too large a drop of blood may lead to a long thick blood smear.
- Too small a drop of blood may cause a short, thin blood smear.
- Clusters or larger white blood cells (monocytes and neutrophils) may develop in the feather edge, resulting in poor cellular distribution, due to moving the spreader forward too slowly.
- Increase the angle of the spreader for patients with extremely low hematocrits (anemia) to avoid a thin, long blood smear.
- Decrease the angle of the spreader for patients with extremely high hematocrits (polycythemia) to avoid thick, short blood smears.
- Thin and thick area through the blood smear indicates uneven pressure.
- Tails throughout the feather edge maybe due to a chipped or a rough edge on the spreader.
- Not allowing the blood to spread across the entire surface before spreading results in a long streak of blood straight down the middle of the smear.
- Holes throughout the blood smear may be caused by dirt or grease on the blood smear.
- Drying artifacts may occur if not dried properly. Allow to air-dry and do not blow on the slide or wave it in the air.
- Induced EDTA platelet clumping can occur in a very small percentage of patients leading to spuriously low platelet counts (thrombocytopenia), and falsely increased white blood cell counts (pseudo-leukocytosis).
- A phenomenon known as platelet satellitosis/satellitism (platelets surround and stick to neutrophils), may occur, resulting in a pseudo-thrombocytopenia.