1.5 Other Types of Diodes
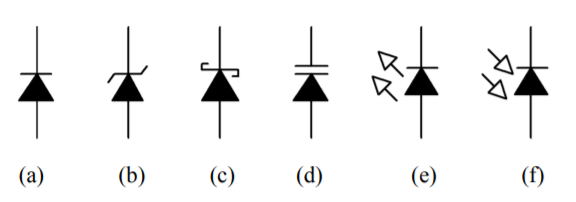
Diodes have been designed to exploit different aspects of PN junctions. Besides the basic use as a switching or rectifying device, diodes are available for voltage regulation, variable capacitance, illumination and light sensing. The schematic symbols for a number of popular diode types are shown in Figure 1.5.1. Note the similarities of the symbols. The “bar” portion represents the cathode for all of them.
Zener Diode
The Zener diode behaves like an ordinary signal diode when forward-biased. Normally, though, Zeners are used in a reverse-bias condition. From our previous discussion, recall that if the reverse potential is high enough, a diode can go into breakdown, causing a rapid increase current. This was caused by either of two effects, Zener conduction or avalanche. The Zener diode takes advantage of this in order to produce a stable voltage.[1] Zeners are specified by their reverse potential (generically referred to as the “Zener voltage”) and are designed to handle larger currents and powers than the average signal diode. Zener voltages are standardized in much the same manner as resistors so values such as 3.9 volts, 5.1 volts and 6.8 volts are to be expected. The Zener voltage is measured at IZT , the Zener test current. A lower current may not fully push the diode into conduction resulting in a lower than expected diode potential.

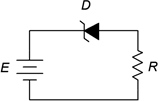
Instead of modeling the Zener as an open switch when reverse-biased, instead we model it as an open when its voltage is less than the rated voltage, and as a voltage source equal to the rated value if its voltage tries to exceed that value. When analyzing Zener- based circuits, the first thing to do is determine if the diode is forward-biased. If it is then treat it like an ordinary switching diode. If, on the other hand, it is reverse-biased then treat it like an open switch. If the resulting diode voltage is greater than the Zener voltage then recompute the circuit but this time mentally replace the Zener with a voltage source equal to the Zener voltage. Our next example will illustrate this method.
Example 1.5.1
![]()
![]()
![]()
Computer Simulation
A Zener diode circuit is simulated as shown in Figure 1.5.4.
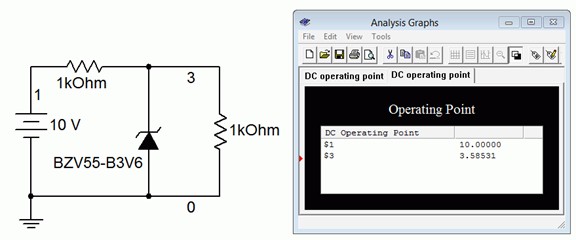
Without the Zener, the two resistors would simply split the supply voltage equally, each receiving 5 volts. If an ordinary diode was used it would be reverse-biased and act as an open. The resulting voltages would be the same. In this case, however, the Zener is activated at 3.6 volts (it is typical to include the Zener voltage as part of the model number with the letter “V” replacing the decimal point when needed). Therefore we see roughly 3.6 volts across the Zener and the parallel second resistor (node 3 to ground). The precise value of voltage will depend on the magnitude of the diode current. If the simulation is rerun with a higher voltage source, the increased current will produce a slightly higher voltage at node 3. This is because the breakdown curve is not infinitely steep once it goes past the rated Zener voltage. The effect is similar to that of Rbulk in a forward-biased diode. On a data sheet this value is referred to as the differential resistance, or Rdif .
An excellent use of the Zener is to limit or regulate a voltage. When a Zener is placed in parallel with other components we can ensure that those components will not see a potential higher than the rated Zener voltage. We will take a much closer look at this in the next chapter.
Light Emitting Diode (LED) and Photodiode
The light emitting diode (LED) and photodiode are complements. While the LED produces light with an electrical input, the photodiode produces a current when exposed to light. Both devices can operate within the human visible spectrum and can also be designed to operate at wavelengths outside this range, in the infrared (IR) and ultraviolet (UV). In fact, most TV remote controls rely on IR emitter/detector pairs for communication.[2]

The LED has displaced traditional incandescent (filament-based) light sources in many applications due to its high efficiency in turning an electrical energy input into a light output. They are small, physically robust, operate relatively cool and are available in a number of different colors. The schematic symbol is shown in Figure 1.5.5. The basic idea behind its operation is fairly simple. In a forward-biased PN junction, when free electrons recombine and “fall” into lower energy valence holes they must give up this energy differential in some manner. In most diodes, this energy is emitted as heat. In LEDs, the energy transition is designed such that it is radiated at shorter wavelengths (i.e., visible light). In order to achieve this, LEDs are not formed just using silicon as in a typical switching diode. Instead, somewhat more exotic materials are used. From an analysis or design standpoint, the important thing to remember is that the forward voltage tends to be noticeably higher than silicon’s 0.7 volt drop. The precise value will depend on the material, which in turn effects the color. A generic red LED will likely exhibit a forward drop of around 1.8 volts or so. Other colors tend to be somewhat higher as we move through the rainbow, ending with blue and UV LEDs (and also high brightness versions) up around 3 to 4 volts. In a lab it is easy to determine the approximate forward drop of a given diode by connecting it in series with a voltage source and current limiting resistor. The supply is increased until the desired brightness is achieved and then the diode drop can be measured with a DMM. When reverse-biased the LED behaves like a switching diode, that is, it looks like an open switch. Unlike switching and rectifying diodes, LED maximum reverse potentials tend to be relatively low, perhaps just a few volts.
A datasheet for the Cree C566D series LED is presented in Figure 1.5.6. Notice that the colors are specified in terms of wavelength (in nanometers) and luminous intensity (brightness) is given in millicandella (mcd).

These devices are RoHS compliant which stands for Restriction of Hazardous Substances. It is an EU directive that limits usage of toxic materials such as lead, cadmium and mercury. Continuing, we find the device maximum ratings:

Note the different values between the various colors. The forward current is specified as 50 mA for red/amber with 35 mA for green/blue. Nominal operating currents are between 10 and 30 mA. Reverse voltage is 5 volts, typical for many LEDs although much lower than the average switching diode. Forward voltage is typically 2.1 volts for the red end of the spectrum and, as expected, 3.4 volts for the green/blue end. The expected luminous intensities also vary with color. Further, it should be noted that LEDs do not produce “pure color” light in the manner of a laser. Rather, they produce a range of wavelengths clustered in a specific area. The wavelength that produces the highest output in this area is referred to as the peak or dominant wavelength. Human vision covers the range of roughly 400 nanometers (violet) to 700 nanometers (red).[3]
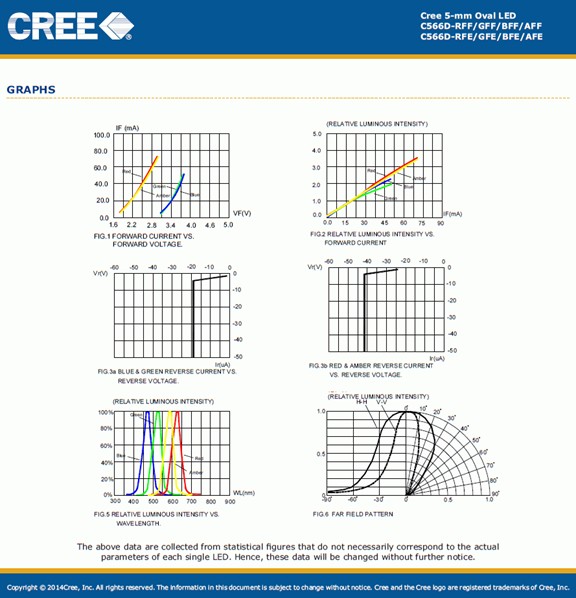
Figure 1.5.6c presents pertinent graphical data. We observe a roughly linear increase in luminous intensity with increasing current. Also, note the difference in the reverse voltage/current plots between blue/green and red/amber. Of particular interest is the final graph which shows the beam pattern or beam angle. You can think of this in terms of how narrow or broad the illumination pattern is. When comparing different model LEDs it is useful to remember that on-axis brightness can be increased by narrowing the angle. This graph is split in half using two different ways of showing the data. On the left side we have a linear graph depicting the relative brightness as we move off of the center axis (zero degrees). On the right side we see a polar plot version of the same data.
Examples 1.5.2
Determine the circulating current for the circuit in Figure 1.5.7. Assume the power supply is 5 volts, the LED forward voltage is 2.1 volts and the resistor is 330 Ω.
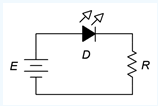
The LED is forward-biased and as the source is greater than the LED potential, it should light. Using KVL,
![]()
![]()
![]()
This should result in a relatively bright LED. The resistor can be used to effectively program the brightness by changing the current level (a smaller resistance yields a higher current and therefore a brighter LED). Given the 2.1 volt forward potential, it is likely that this is an amber or yellow LED. If a different color had been used, say a 1.6 volt red or 3.2 volt blue, there would be a change in current and most likely a change in brightness. The change in brightness might not perfectly echo the change in current because the conversion efficiency for the two diodes may not be the same (refer to Figure 1.5.7b to compare the luminous intensities at 20 mA for different wavelengths).Figure 1.5.8: Dual LED application.
An interesting circuit using two differently colored LEDs is shown in Figure 1.5.8. An AC source is used to drive the LEDs. Only one of the two will be forward-biased at any given time. For positive source voltages D1 will be on while D2 will be off. For negative source voltages the opposite will be true. Resistor R serves to limit current for both of them. Assume D1 is red and D2 is blue. Further, suppose the source frequency is relative low, say 1 hertz. For the positive half cycle (.5 seconds) the red LED will light and for the negative half cycle the blue LED will light. This alternating pattern continues for as long as the source is applied but a curious thing happens as we increase the frequency. At first, the blink rate will increase with the red and blue flickering back and forth faster and faster. At some point, perhaps around 30 hertz or so, it will appear as though both LEDs are lit continuously. This is because the human visual sense will tend to integrate the rapid motion and we effectively see the “average” intensity. In fact, this “on-off” trick is often used in digital circuits to control the brightness of LEDs or the speed of motors. Bi-color LEDs are available in a single package. Using a common lead and two control leads (one for each color), it is possible to achieve color mixing.
The logical inverse of the LED is the photodiode, the schematic symbol of which is illustrated in Figure 1.5.9. The photodiode includes some manner of port that allows light to hit the junction. A sufficiently energetic photon of light can knock lose an electron. This creates an electron-hole pair which results in current flow. As more light energy is added to the system, an increasing current or voltage will result.[4]
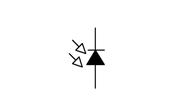
Photodiodes can operate in one of two modes. The first mode is photovoltaic mode. It uses zero-bias (that is, no external bias potential). In this mode, the photodiode operates as a voltage source. This is the mode used by photovoltaic solar cells. They can be thought of as very large photodiodes. The second mode of operation is photoconductive mode. This mode requires reverse-biasing the diode with an external potential. In this mode the diode acts more like a current source. The advantage is that the response is faster than photovoltaic mode. The downside is that noise and dark current are worse. Dark current is the current produced even when no light is shining on the photodiode. Ideally this would be zero. A large dark current reduces the effective dynamic range of the device.
Schottky and Varactor Diodes
The Schottky diode is a special purpose device. It is named after Walter Schottky, a German physicist. Unlike other diodes that rely on a semiconductor-tosemiconductor junction, the schottky diode is comprised of a semiconductor-tometal contact. The Schottky diode exhibits two major advantages over traditional diodes. First, they have very fast switching times, perhaps orders of magnitude of improvement. Second, they exhibit relatively low turn on voltages. Instead of the 0.6 to 0.7 volts seen with a silicon junction diode, a Schottky diode may turn on with as little as 0.2 or 0.3 volts. Consequently, Schottky diodes are used when very fast switching speed and/or minimizing forward voltage drops are important. Examples include shunting diodes in switch mode power supplies and RF detector circuits. Its schematic symbol is shown in Figure 1.5.10.

The varactor diode is another special purpose device. Its schematic symbol is illustrated in Figure 1.5.11. It is used as an electrically controlled capacitance (note that the schematic symbol appears as a hybrid of normal diode and capacitor symbols).

Varactors are used in reverse-bias mode. The key to understanding their operation is to consider the structure of a diode, comparing it to the construction of a capacitor. Consider the depletion region to be the dielectric of a capacitor with the anode and cathode being the capacitor plates. Consequently, all junction diodes exhibit some capacitance. Normally, designers try to minimize this effect but it is exploited with varactors. As noted in our earlier discussion, increasing the reverse-bias potential on a diode causes its depletion region to widen. All else being equal, increasing the plate separation of a capacitor decreases its capacitance. Thus, by increasing the reverse-bias potential, we increase the effective plate spacing and decrease the diode junction capacitance. We now have a capacitance the value of which is determined by a DC bias voltage. This capacitance can be used as part of electronic tuning circuits for applications such as oscillators and filters. Compared to fixed capacitors the values tend to be small, in the tens to hundreds of picofarads, but it is sufficient for much radio frequency work. The advantages over mechanically adjustable capacitors are manifold, including small size, high reliability, low cost and the ability to rapidly change the capacitance.[5]
- Although they are called Zener diodes, they rely on either the Zener or avalanche effects, depending on the magnitude of the voltage. ↵
- There are advantages to using the infrared over the visible spectrum for this application. It tends to be less sensitive to room lighting conditions and there are no potentially annoying visible flashes of light coming from the remote. ↵
- It is interesting to observe that the human visual system operates over a frequency range of less than 2:1 while the human auditory system operates over a frequency range of about 1000:1 (20 hertz to 20,000 hertz). If human hearing had a range equivalent to that of our sight, we'd hear less than a full octave of pitches in total. In other words, do-re-mi-fa-sol-la-ti-do would end at ti and anything beyond would be inaudible. In such a case one thing is certain: piano keyboards would be much shorter. ↵
- As a side note, depending on their construction some LEDs can be used as crude photodiodes. Although they are not optimized for this use it can be entertaining to shine a light on an LED and watch it produce a voltage. ↵
- The mechanical version would require a rotary-style adjustable capacitor connected to some form of small motor or solenoid to move the capacitor plates. While this can work at lower frequencies, if rapid changes are needed the resulting friction-generated heat may cause this contraption to burst into flames. Generally speaking, this is not something we want our circuits to do. ↵

